Infrastructure As Code
In these pages I will try to explain what infrastructure as code is and how I created this.
It is the most widely used way to configure systems, because it gives a layered installation, in which each layer can be tested separately before deployment in production.
In these pages we will go through the theory of the buildingblock strategy and we will first explain what it is and then try to a possible implementation of this.
The first part is non technical and helps with a general understanding of this way of building.
The second part will handle steps to do in a sort of text flow chart.
The last part wil describe actual code from an implementation.

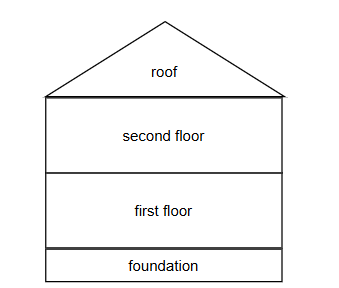
Building a house
Think of building your infrastructure in your virtual system as if it was a house:
- first: thing you do is lay the foundation
- second: is the first floor
- third: a second story (if you need it)
- last: add the roof
This procedure can be repeated for almost any house ( with some differences for each house), this is where the variables come in to modify the behaviour of the buildingblocks used to build the house. Later more on this.
Each of these steps is a separate playbook and therefore a possible step in a workflow
The foundation
This will be base of your house, it must be strong enough to support your whole house.
The components of a standard foundation:
- start with a standard image from your supplier (like redhat UBI)
- enable your ansible account in the image
- configure network
- create additional disks
Variables for this step:
ip_address: <ip-address>
hostname: <hostname>
disk:
  - name: </dev/name1>
    size: <size>
    lvm_vg: database
  - name: </dev/name2>
    size: <size>
    lvm_vg: application
I don't specify any technical details for these variables, this varies with each implementation, but it should be somewhat obvious we need them. I also don't descibe where these come from, this is also installation dependent, we will address this later.
Ground floor (or first floor)
Here you wil find the rooms (storage volumes) for the OS and the later layers, these are created from the vars added to the machine.
Additional tasks:
- configure network services
- start the firewall, open only port 22
- apply hardening
- time sync
- apply selinux policies
- register system to monitoring
And whatever your company requires, as long as it fits the foundation and has nothing to do with applications.
In the foundation (as this is where the machine is created) the number of cpu's and memory is usually implemented, through the creation of the VM.
In this step you might also register your new system to software management systems, like RedHat satellite or online repositories to be able to apply security updates.
This is the moment to apply the latest security updates for the system you created, if the base image is not too old, this should not take much time.
The additional variables for this part of the installation (if any):
resolving:
  dns: <dns_ipaddress>
  domain: <search_domain>
  options: <dns_options>
time:
  servers: <time_servers>
  zone: <timezone>
lvm:
  - lv_name: data
    mountpoint: /data/db
    size: <size>
    vg_name: database
  - lv_name: application
    mountpoint: /data/application
    size: <size>
    vg_name: application
These variables are an extension to the variables for the foundation and tell the code what disk to use and what size the filesystem to create has to be. Once the filesystem is created, it will be mounted on the given mountpoint. This way the storage will be availlable to the next step.
Optional second story
The second story of our Virtual Machine building is a middleware layer (if we need one for our application).
First we need to define what middleware is:
Middleware
Is software that is needed for an application to run- or store/get data that is not part of the application itself.
So what qualifies as middleware?
- databases
- runtimes (jboss, java and others)
- messaging queing apps
- many others..
Not all of these will be installed on the same host as the application, but sometimes we need client packages installed and configured. As these can be used for multiple applications, we create a separate playbook for this, so it can be reused.
The roof
The last step of building a house is the installation of the roof (application).
This completes the installation of the host and leaves the application in a running state.
Form this moment, clients, end users can use the application.
This concludes part one, the overview.
Pseudo Code Infrastructure
In this second part we go somewhat deeper into the code, but this is in no way code. In the old days of IT development a step in the development of software was writing pseudo code. This was not executable code, but a text step inbetween to write what certain steps would have to do.
Ansible is in its descriptive nature a form of speudo code itself.
I use the term pseudo code here, to describe results that a block of tasks should accomplish, this creates a better overview on the play than a list of 100 tasks.
In this part, we will take each playbook and separate this into parts that we can relate to, but are still not ansible tasks, these are more like blocks of tasks. This way we can have a simple list of things to do creating a large play that will do many tasks.
Most of the time these blocks will translate to ansible roles.
Foundation (VM creation)
For the foundation, we can see these global tasks:
validate_variables:
  test if all vars needed are defined

create_vars_for_VM_creation:
  ensure all params are in place
  to create the vm

if host_in_cloud:
  create_network:
    create network path for host(s)
    register ip_address
    register hostname

register_vm_in DNS:
  ensure the hostname resolves
  to the correct ip address

create_the_vm:
  create the virtual machine using the vars
  and the template image
  wait for the VM to boot
You see that is part is a rather limited set of blocks and easy to follow. But creating the variable for vm creation can be an enormous structure spanning multiple pages in your playbook. This way you know what tasks are ahead of you.
Describes here is only the deployment flow, this becomes more complex, if you add host deletion and/or redeployment strategies into the same play.
An example:
validate_variables:
  test if all vars needed are defined

If strategy is 'create or redeploy':
  create_vars_for_VM_creation:
    ensure all params are in place
    to create the vm

If strategy is 'remove':
  unregister_vm_in DNS:
    ensure the hostname no longer resolves
    cleanup DNS

IF strategy is 'redeploy or remove':
  delete the VM from virtual platform

If strategy is 'create':
  register_vm_in DNS:
    ensure the hostname resolves
    to the correct ip address

If strategy is 'create or redeploy':
  create_the_vm:
    create the virtual machine using the vars
    and the template image
    wait for the VM to boot
This is where you can validate the sequence of events and if thing stay valid in the process.
An error in this execution order could leave you with a lengthy install process, with no result if you throw away the system after installation.
I aways work with the latter version of the above flow, so I can cleanup systems I created, or even recover non-funtioning servers, by creating them from scratch.
First floor (system adoption)
As the system is created, we need to make the system valid for the organization it will run in (adopt it in the IT landscape). This means configure the storage, adding security, LDAP, monitoring and much more.
In this part the sequence is, as in any other step, of the essence. So here we can add some clarity.
Again, these are just examples, you must fill in the list for your organization:
validate_variables:
  are all variables needed present and valid?

if lvm is defined:
  create partitions:
    on additional disks

  create volume groups:
    on partitioned disks

  create logical volumes:
    in correct volume groups
    with configured size
    format volume

  mount:
    create the mountpoints
    mount the volumes

configure resolving:
  configure resolv.conf

configure firewall:
  install firewall packages
  ensure only port 22 is opened
  enable and start firewall service

configure time:
  install packages
  configure timezone
  configure timesync
  enable time service

configure monitoring:
  install packages
  open firewall port (if needed)
  configure/register monitoring
  enable monitoring service

configure logrotation:
  install packages
  configure logrotation

enforce selinux policies:
  install packages
  configure policies
  ensure selinux is enforcing

configure logon services:
  install packages
  configure pam
  enable logon service

create local users:
  create local accounts
  create homes directories
  set access rights

configure sudoers:
  configure sudoers as needed
These are the most common steps in any organization, there can be meny more, but you can already see that each section has a list of basic tasks. translate this to roles and you know what to add into a role and this list gives you the order in which to execute the tasks/roles.
After use don't throw this away, but add it to your documentation, this way you have the overview over the roles and steps that are executed during deployment.
second floor (Middleware or layered product)
This is called second floor, but this can be used multiple times to install a number of middleware packages.
As already stated in the previous section there can be multiple dependencies for an application to run, these middleware dependencies are not always installaed on the same system as the application, but in testing environments this could well be used as such to save on system costs.
The purpose of this step is to install a middleware service, each separate, to enable multi-server setups.
For a database:
if database is defined:
  install database:
    install packages
    configure database
    configure database authentication
    configure firewall port
    enable and start database service
    ensure database backup schedule
You see that no data is imported into the database, this is not the responsibility of the database installation. This must be done by the application that will use the database, this way the playbook/role is generic.
For an application server platform:
if jboss is defined:
  install jboss packages
  configure defaults
  configure firewall ports (for jboss only)
  enable and start service
Again, no application specific configuration, the application has to create its own configuration, so this can stay generic.
The roof (Application)
The last part of this host installation is the installation and configuration of the application.
As all the previous parts were of a generic nature, we must now add configurations for all the parts that are used in this application. So the installation of an application can be very simple, like install package and run the app. Or it can be very complex.
In the simplest configuration you won't need a overview like we made for the previous steps, but I advise you to still create it and add it to the documentation. It is part of the documentation standards and future changes will have its place.
if database is defined:
  add connection

if database is local:
  if data not present:
    restore or create data

install_application:
  prepare applicationserver:
    create directories
    create application profile
    add datasource
    add message queus
    install dependencies

  install application:
    install packages
    open firewall application ports
    start application
Ansible Code
This is the part where the real work will have to be done, it is totally up to you.
Use your knowledge, AI or whatever you want/must to create the automation you need.
I gave you a lot of info, but I cannot automate standards for each and every organization.
There are lots of examples out there, some good, some very outdated, but still examples that can help you create.
You will learn best by doing and failing, not by copiing..
So build, test, fail, rebuild, test again.... itterate until it works..
Testing is the big word here, test until you drop...
Then you will have learnt something, trust and believe in yourself.
Not all of the internet...
Some tips on development:
Create roles:
- Each role has a separate repository
- Keep playbooks small
- Create playbooks to do one thing right
- Related tasks/variables must reside in the same repository
When you migrate from roles to collections, the step is not so big, you move the code from the role, into the roles directory of the collection. This is almost all there is, but version management is no longer on the role itself, but now on collection versions.
So start small, create separate roles..
Example
Create a play to execute the roles based on conditions in inventory (like group membership).
I'll give an example of the play and the roles included for a infrastructure playbook that can handle multiple virtualization platforms. This will not be a functional play, but an example of how you could set things up.
This example is a simplification of actual code used for deployment.
The infrastructure playbook here is called from the automation platform to create a VM on a virtualization platform. The only real parameter the play receives is the hostname of the machine to create. This host is in the inventory where all variables for this host can be found to instanciate the machine.
Very simplified inventory example:
all:
  children:
    vmware:
      children:
        ansible:
          children:
            vm:
              hosts:
                host-1.example.org:
    vmware_cluster:
      children:
        vmware_nodes:
    proxmox:
      children:
        ansible:
          children:
            qemu:
              hosts:
                host-2.example.org:
    proxmox_cluster:
      children:
        proxmox_nodes:
You see here that host-1.example.org is to be deployed on vmware and host-2.example.org is to be deployed on proxmox.
Both virtualization platforms require specific code to be able to create a VM, but how can we call the right roles for each host?
In reality, this inventory is much more complex and part of a dynamic inventory, in which the hosts imported from the platforms are mapped to the groups in the above file.
Simplified infrastructure playbook, called by automation platform in VM creation:
---
- name: Configure the host on infrastructure
  hosts: "{{ instances | default('localhost') }}"
  gather_facts: false

  pre_tasks:

    # Run the infrastructure roles to create the VM's and register them to Satellite
  roles:
    - role: role_infrastructure_vmware
      when: "'vmware' in group_names"
    - role: role_infrastructure_proxmox_qemu
      when: "'qemu' in group_names"
    - role: role_infrastructure_proxmox_lxc
      when: "'lxc' in group_names"
    - role: role_infrastructure_lvm
      when: lvm is defined
    - role: role_infrastructure_satellite
      when: satellite_server is defined
If your read the pages leading to this one, you'll see that this play only creates the foundation part of a complete workflow to create a VM including the application, this is the first step that is equal for all virtual machines.
Each step is conditional and depending on variables or group membership, especially the choice of the virtualization platform is dependent of the group membership in the inventory. This makes it easy to migrate a machine between platforms (migrate is not the correct term, relocate by installation is better).
This setup gives a dynamic, inventory driven way to instanciate machines on different platforms, while keeping the base structure the same. Just add sections to the inventory and roles to the infrastructure playbook to enable a new virtualization platform, this way you'll create a modular and extensible deployment strategy, based on inventory variables and groups.
This is just the first layer, but I hope You get the idea.
The first layers will inherit this structure, to make the system compliant for your organization as a base system deployment.
Layers later in the workflow can be specific for the installation (middleware or application).
All layers are stacked in a workflow job_template that executes all layers in the correct order for deployment. (See configuration as code for rhaap for workflow definition).
Let us see what some roles could do:
role_infrastructure_proxmox_lxc
role_infrastructure_proxmox_qemu
role_infrastructure_lvm