Lab in a Box
This installation is no longer in use by me, so the content here is no longer maintained.

You can still use this, with this regard that you must update the products.
Introduction
This documentation will explain how to setup a lab environment for ansible development on a single computer with Oracle virtualbox as host for the complete environment.
In this documentation we discuss an environment that matches an Enterprise environment as close as possible.
My goal with this setup was to be fully self contained, no need for external connections to develop, test and deploy a linux platform. Its your choice to use an external git, like GitHub or a corporate GIT implementation, but your will be dependant of a network connection for this. I wanted to be able to work during commutes, where there is no internet connection availlable.
As a deployment with ansible enviroment depends heavily on DNS, so we need to add one to the lab environment. We use the repository server for that, since an apache server will not overload the system. In the infrastructure_vbox code, the newly deployed hosts will be added to the deployment server. For the other machines, the DNS server takes care of business.
I am assuming here, that you have some knowledge of linux and the distribution you want to use. Not everything will be explained 'to the bone'.... For more detail, RTFM... its in the links page
You should be comfortable working with a git implementation.
Be aware that most of the components discussed here are licensed, for most of these there are free alternatives, which we will mention, but not discuss, except for the repository server which can act as an alternative for satellite. If You want to use those alternatives, there is lots of documentation out there...
Hardware requirements (minimum):
Creating a Redhat Enterpise environment in a box is resource intensive, so expect to spent
some money in buying hardware for this.
Your system needs to meet the following requirements:
- 64GB memory (more is better)
- 1 TB SSD dedicated disk (again, more is better)
- 4 core CPU
- virtualization support
Software requirements:
In this documentation we will run on Windows, but this can be setup on Linux as well.
Required software:
- Windows 10 (Home) or better
- Oracle VirtualBox 7.0.6 or better
- Oracle Virtualbox Extension Pack v7.0.6 or better (equal to Virtualbox)
- HashiCorp Vagrant 2.3.4 or better
Next Steps:
Based on the assumption that your system meets the above requirements, the next steps will be:
Preparing windows
In order to run this setup under Windows the following preparation steps are needed on a Windows. All steps for preparation can be found on the internet and the links to these sources can be found in the links.md file in this repository.
Disable Hyper-V virtualization
In Windows 11 Home edition, there is nothing to do here, on Windows 11 Pro the feature Hyper-V must be disabled.
To disable Hyper-V use the following steps:
Open a powershell with administrator privileges:
Run the following powershell command:
Disable-WindowsOptionalFeature -Online -FeatureName Microsoft-Hyper-V-All
Windows will now uninstall these features. Reboot when done
Disable DeviceGuard code integrity
In order to use VirtualBox without performance issues, code integrity (within Defender) must be disabled. To disable this, open the register editor. The registry key to be adapted is the following key:
HKLM\SYSTEM\CurrentControlSet\Control\DeviceGuard\HyperVisorEnforcedCodeIntegrity\Enabled
needs to get the value “0”, his disables the function after reboot.
Install OpenSSH
OpenSSH server is builtin for modern windows releases, its just not installed by default.
Why we use OpenSSH instead of WinRM (Windows Remote Management) for ansible and vagrant:
If you enable WinRM on your system, you do this for all networks, so with the WinRM enabled you might be open for attacks. You might say that OpenSSh holds the same problem, dut we can limit OpenSSH to listen on a specific (internal) interface with no connection option from the bad outside world, thats what we do here.
To install it om your machine, follow the steps:
Open 'Settings'
Click on 'Apps'
In the right pane, select 'Optional features'
Click on 'View features'
In the search box, type 'OpenSSH'
check the 'OpenSSH server' checkbox
click 'Install'
The feature will be installed now...
To start the OpenSSh server service:
Open the 'services' App
Look for 'OpenSSH server', right-click and select 'start'
Change the 'Startup Type' for this service to 'autostart'
The most secure setup is to let the OpenSSH server listen to the host-only network address. eg. 192.168.56.1 this can be changed in the file: C:\ProgramData\ssh\sshd_config Open the file from a powershell with administrator privileges with notepad, so you can edit the file and save it.
Set the default shell for OpenSSH connections to 'Powershell' for ansible..
Open a powershell with administrator privileges:
Run the following powershell command:
New-ItemProperty -Path "HKLM:\SOFTWARE\OpenSSH" -Name DefaultShell -Value "C:\Windows\System32\WindowsPowerShell\v1.0\powershell.exe" -PropertyType String -Force
Windows is now ready to receive your ANSIBLE commands through SSH from a vm in vbox.
Configuring Virtualbox
To run "lab_in_a_box" there are a number of things to configure, like networks, this has to match the host system, or else it just won't work.
Networks
We add a set of custom natnetworks to connect our VM to, so they can see eachother on the network. If we use the default NAT, this wouldn't work...
Open a cmd.exe and cd into 'C:\Progam Files\Oracle\VirtualBox':
VBoxManage natnetwork add --netname natnet1 --network "192.168.15.0/24" --enable
VBoxManage natnetwork add --netname natnet2 --network "10.0.10.0/24" --enable
VBoxManage natnetwork start --netname natnet1
VBoxManage natnetwork start --netname natnet2
This will add 2 custom networks to virtualbox without DHCP server, because we want full control over the network through our inventory in ansible.
On the "natnet1" network, set some port-forwarding rule, so you can access the given port from your windows machine, this make life easier.
First plan for yourself wich VM's need access from port-forwarding and what IP addresses they will get.
In my setup I reserved the bottom range of 20 addresses for management VM's as Automation Platform, Repository Server, GIT server and so on..
Plan these now and write them down for later, we will make the port-frwards here, but they can be added later.
The list that needs port-forwarding (in my case):
| Server | IP address | Port |
| ---------- | ------------ | --------- |
| AAP | 192.168.15.5 | port 80 |
| PrivateHub | 192.168.15.6 | port 80 |
| GIT | 192.168.15.7 | port 3000 |
| Satellite | 192.168.15.8 | port 80 |
Thus the commands to execute to define the port forwarding:
VBoxManage natnetwork modify --netname natnet1 --port-forward-4 "aap:tcp:[]:81:[192.168.15.5]:80"
VBoxManage natnetwork modify --netname natnet1 --port-forward-4 "hub:tcp:[]:82:[192.168.15.6]:80"
VBoxManage natnetwork modify --netname natnet1 --port-forward-4 "git:tcp:[]:3000:[192.168.15.7]:3000"
VBoxManage natnetwork modify --netname natnet1 --port-forward-4 "sat:tcp:[]:83:[192.168.15.8]:80"
Note that the rule is defined followes:
The rule: "aap:tcp:[]:81:[192.168.15.5]:80"
Has 6 fields:
- 'aap' The name of the rule, must be unique
- 'tcp' The protocol to use
- '[]' The source ip address for the rule, if blank all connection to this port are forwarded on the localhost
- '81' The port to forward on the localhost (Windows)
- '[192.168.15.5] The ip addres to forward to (mandatory)
- '80' The port on the target machine to connect to
Check:
In the networks page in Virtualbox check the Host-Only Adapter without a number This is the default adapter that vagrant will use for the VM, this has to be on the
'192.168.56.1/24' network. If it is... OK (its the default)
Resolution
If you have a big screen and want to use the full resolution:
Open a cmd.exe and cd into 'C:\Progam Files\Oracle\VirtualBox':
VBoxManage setextradata global GUI/MaxGuestResolution any
Defaults
As we said in the introduction, we would like a separate drive for our setup data, this is a little paranoia from my side, if anything happens to my windows setup
it is easily restored after windows reinstall.
In virtualbox preferences set the 'Default Machine Folder' to the drive letter you use
A small copy can make life easier on virtualbox:
Copy the 'C:\Program Files\Oracle\VirtualBox\VBoxGuestAdditions.iso' to the root of the drive you use for the VM's.
VirtualBox is now ready for your first virtual machine..
Installing a repository server
A repository server is the source for installing packages after the VM is created and running, if you want to add additional packages to the system, you could mount the dvd and search for them, but with a repository server online, just run yum/dnf install...
We want the repository server to host multiple versions of Rhel, so we adapt the description on the web to our needs.
This host will act as the DNS server for the lab environment.
The VM
First we need to create a VM, with the specs as follows: - CPUs: 1 - Memory: 1024 - Disk: 60GB - Network: natnet1
Packages
For a Repository server apache (httpd) needs to be running on the machine to service the repositories.
So all we install on top of the base install:
- httpd
- kernel-devel
- gcc
- make
- named
Start the machine, install the OS and configure the network IP address.
Do not forget to add the VBoxGuestAdditions
Apache config
The online doc in the links page only configures 1 repository, we want to be able to service more then one, so we add an extra directory to the path, just in front of the repository itself:
We don't change the default documentroot in the httpd.conf, we create the following directories:
mkdir /var/www/html/rhel8
mkdir /var/www/html/rhel9
In those directories, we copy the contents of the respective DVD's we mount on the virtual optical drive. As you copy the full content of the DVD, you are copying repositories and there is no need for the create repo command.
Do not forget to open the firewall for http traffic...
firewall-cmd --add-service=http --permanent
firewall-cmd --add-servece=dns --permanent
firewall-cmd --reload
On the subsequent VM's you can now enable this machine as your local repository server for yum
Place the following content in the file: /etc/yum.repos.d/local.repo
[BaseOs]
name=BaseOs packages 8.7
metadata_expire=-1
gpg_check=1
cost=500
enabled=1
baseurl=http://reposerver/rhel8/BaseOS/
gpgkey=file:///etc/pki/rpm-gpg/RPM-GPG-KEY-redhat-release

[AppStream]
name=AppStream packages 8.7
metadata_expire=-1
gpg_check=1
cost=500
enabled=1
baseurl=http://reposerver/rhel8/AppStream/
gpgkey=file:///etc/pki/rpm-gpg/RPM-GPG-KEY-redhat-release
Obviously the above is for a rhel8 installation, adapt settings for rhel9 if needed.
Your new VM can install packges from the reposerver now.
DNS config
The named package ensures that the named software is installed. Now we have to configure the domain to make it run.
We create the following files in the /var/named folder localdomain.forward localdomain.rev
The files have the following content:
localdomain.forward
$TTL 3600
@ SOA reposerver.localdomain. root.localdomain. (
                                        4      ;Serial
                                        15m    ;Refresh
                                        5m     ;Retry
                                        30d    ;Expire
                                        1h     ;Minimum TTL
)
    NS reposerver.localdomain.
    A 192.168.15.20

rhel9-1         IN  A   192.168.15.10
rhel9-2         IN  A   192.168.15.11
reposerver      IN  A   192.168.15.20
gitserver       IN  A   192.168.15.21
privatehub      IN  A   192.168.15.22
...
localdomain.rev
$TTL 86400
@ IN SOA reposerver.localdomain. root.localdomain. (
                                            2020011801 ;Serial
                                            3600 ;Refresh
                                            1800 ;Retry
                                            604800 ;Expire
                                            86400 ;Minimum TTL
)
;Name Server Information
@ IN NS reposerver.localdomain.
reposerver     IN      A       192.168.15.20

;Reverse lookup for Name Server
20 IN PTR reposerver.localdomain.

;PTR Record IP address to Hostname
10      IN      PTR     rhel9-1.localdomain.
11      IN      PTR     rhel9-2.localdomain.
20  IN  PTR reposerver.localdomain.
/etc/named.conf
Add or modify the following options in the /etc/named.conf
options {
    directory   "/var/named";
    forwarders  { 8.8.8.8; };
    allow-query     { localhost; 192.168.15.0/24; };

    recursion yes;


zone "localdomain." IN {
    type master;
    file "localdomain.forward";
};

zone "15.168.192.in-addr.arpa" IN {
        type master;
        file "localdomain.rev";
};
Add the named service to start with the system and add the nodes to the dns files Run the service and enjoy your dns..
Create your own GIT server
Now the environment is running, it is time to test if we can run a VM.
We now need a additional component and that is the OS install media as iso file. Most distributions have one ready to download, take the time to select and download the correct iso file and store it on your drive that will host the VM's.
assuming you are ready to proceed:
Create your fist set of VM's
We create 2 VM's now, the goal is to make one of them a GIT server, the other will be a development machine to write code or to do other things. We need this one to setup the git machine for us.
Start virtualbox (if yoou didn't already) and klick on 'Add machine' in the menu. A new dialog will open and here you can define the basic settings for you new virtual machine. While it is tempting, we will not use 'unattended Installation' as we don't have control over the features that will be used for installation.
First machine
The first machine to create will be the GIT server, this is our central repository for all code, so we want this one first. To define the machine, use the following parameters:
- Name: The name of the virtual machine (I used 'gitserver')
- Folder: This should be correct already, if you set the default earlier
- ISO Image: Select the downloaded iso image for the distribution you want to use
- Type: Pobably already changed to Linux(autodetected) else change it
- Version: Select the correct version for the distro
- Skip Unattended: Check this box, so you can install the distro yourself
In the hardware Tab:
- Set memory to 2048 MB (it probably is already)
- Set CPUs to 1
- Do not! enable uefi
In the hard disk Tab:
The defaults will do, 20 GB disk is sufficient for a git server.
Click 'OK' to create the VM
In the settings of the created VM, still need to adapt the network.
For the first network adapter, set it to 'Nat Network' and 'natnet1'.
If you dont do this the machine will not have the correct settings.
Now 'Start' the VM
You will see a VM booting from the iso image and from here you have to install the OS.
Be sure to manually configure the IP address (192.168.15.7) during installation.
Add the user ansible to the system, with key authentication, so you can run playbooks against the system.
Second machine
Now we do almost the same thing, but this time be sure to install a X11 desktop the other settings will be ok..except of the ip address of course, that should be different
Next steps
Next there will be a few tasks for you to make it all work..
- You will need to setup a ansible user with key authentication between the machines.
- configure both machines in /etc/hosts
- install ansible (if not already installed)
- give the ansible user access to sudo
- install git package
- install python3-psycopg2 package
For GIT, we use gitea, see the links page for the documentation, the documentation is not the best, but it will work. What you must do, is install the packages now that are needed to run gitea in the first place, so be sure to install those dependencies now.
- postgresql v10 or better
- git v2 or better
- kernel-devel (not for git, but for the guest additions of VBox)
- gcc
- make
After the installation has finished, reboot the VM's and remove the iso from the drive.
Place the VBoxGuestAdditions.iso in the optical drive and install these, it makes life a lot easier.
We now have a system ready for gitea installation, follow the manual from the links page and install gitea.
If you want to do this a lot faster.. you can use the playbook in the lab_files to deploy the gittea service on a host, this will setup your gitea from start to finish.
after the playbook finishes successfully, go to http://\<your_git_hostname>:3000
and be the first to register and become the admin :-)
Add users/projects as required in your lab....The power is yours
Installing Ansible Automation Platform
Almost there....
This is the most important part of the 'lab in a box'.. and the most resource hungry part... this will cost you the better part of your resources, if you are
on the minimum sizing stated in the first page.
Containerized Ansible Automation Platform in its smallest installation consists of a single VM:
Ansible Automation Platform
The containerized automationplatform is the heart of your datacenter deployment installation, it runs the ansible playbooks to deploy your machines.
It needs to have the following minimum specs to run/install:
- memory: 16GB
- CPU's: 4
- storage: 50GB (minimum, 100GB recomended)
In our setup we need to allocate 2 network adapters for the machine:
- a 'Nat Network' on 'natnet1' as primary interface
- a 'Host-Only' adapter 'Virtualbox Host-Only Ethernet Adapter' as secondary interface
The first adapter is used to communicate with all VM's in the virtual network.
The second adapter is used for communication with your vbox host to deploy 'vagrant' machine's, which we will cover later.
Installation
Take your time to read the installation documentation, this will save you time in the end. Be aware that a license is always required, in a homelab you can use a developers license from redhat. If you or your organization do not have a license, go awx.. .
AWX
AWX has no private hub functionality, so there is more work to be done to set it up. As a bonus, it runs in a docker container and doesn't need as much resources it seems.
I haven't used it, I wanted to stay as close to an enterprise environment as possible.
Post installation tasks
After you have installed Ansible Automation Platform, configure a Basic organization, Team and user. Setup synchronisation between the private hub and the redhat/community repositories Create a requirements.yml file with at least these collections in it:
---
collections:
  - community.general
  - community.vmware
  - community.windows
  - ansible.posix
  - ansible.windows
and upload this file to the private hub to have these repositories synced and availlable.
Setup an 'ansible' user and generate a ssh-key pair on the controller.
copy the public key to your windows host machine (ssh-copy-id will not work) and place this file as administrators_authorized_keys in the folder: 'C:\ProgramData\ssh\'
You will now have key based access to you windows host with powershell, and also your automation controller.
This is one of the most important things to have working now, the rest is ansible configuration and playbooks.
Inventory setup
Nothing works in AWX or Ansible Automation Platform without a decent inventory.
We could create a dynamic inventory, but we keep it stupidly simple for our lab environment.
We create this inventory in a folder named 'inventory' and push this as inventory into a new repository in our git server. After this the inventory can be configured in Ansible Automation Platform as inventory. And magically your controller knows where to do things :-)
Here is a tree view of the inventory:
.
├── group_vars
│   ├── all
│   │   ├── env.yml
│   │   └── satellite.yml
│   ├── dev.yml
│   ├── vbox8.yml
│   └── vbox9.yml
├── hosts.ini
├── host_vars
│   ├── aapserver.localdomain.yml
│   ├── gitserver.localdomain.yml
│   ├── privatehub.localdomain.yml
│   ├── reposerver.localdomain.yml
│   ├── satellite.localdomain.yml
│   ├── testhost1.localdomain.yml
│   ├── testhost2.localdomain.yml
│   ├── testhost3.localdomain.yml
│   └── virtserver.localdomain.yml
└── vars.yml
We will walk you through every file in the inventory to see whats in there and why.
group_vars
This is the directory where all the groups are hosted and the vars for these groups are defined.
We don't want to repeat the definition of vars, so we stack them in layers, using the groups and children.
group_vars/all
The 'all' folder, holds variables that are added to 'ALL' hosts, no matter what the filename all hosts know these vars.
In this part of the inventory you typically set variables that apply to 'ALL' machines in the environment You can split this up into multiple files, so you can give them meaningfull names. This is a simplified version of the actual inventory I use, so splitting up in several files is a good thing to do.
* env.yml
This file holds vars that are generic for the environment.
env: Development
envShort: D
etc_hosts: all
etc_hosts_enabled: true
motd_message: Ongeautoriseerd gebruik van dit computersysteem en de daaraan gekoppelde
  apparatuur en programmatuur is verboden
ntp_timezone: Europe/Amsterdam
- satellite.yml This file defines if there is a satellite (in my case its True), but here is false so I can use the artifact server as local repository server in my ansible code.
artifact_server: reposerver.localdomain
middleware_server: 'http://{{ artifact_server }}/pub/middleware'
satellite_present: false
satellite_organization_label: Default_Organization
satellite_organization_name: TEST
satellite_server: satellite.localdomain
group_vars/dev.yml
As you can see the closer we get to the actual system, the more detail there will be in the defined vars, here we define the vars for the dev environment, for acceptance or prod, they would be different
dns_domain: localdomain
dns_servers:
- 8.8.8.8
location_name: DEV
ntp_servers:
- ntp1.time.nl
- ntp2.time.nl
redhat_insights_enabled: false
group_vars/vbox8.yml
Here we start to link the deployment environment to the actual machines, the networks are defined as they are defined in the virtualbox configuration. The host for the virtualbox is also defined here. The last 3 vars in this file, are defined to tell the deployment playbook, what template 'box' to use and in what virtualboxgroup the vm is to be built.
vbox:
  server: virtserver.localdomain
  networks:
    backend1:
      netmask: 255.255.255.0
      network: 10.0.10.0
      net_name: natnet2
    frontend1:
      gateway: 192.168.15.1
      netmask: 255.255.255.0
      network: 192.168.15.0
      net_name: natnet1
  vm_folder: 'F:'
  vm_group: datacenter
  template_box: redhat/rhel-8
group_vars/vbox9.yml
Same as the vbox8.yml, with the exception of the template name(1).
vbox:
  server: virtserver.localdomain
  networks:
    backend1:
      netmask: 255.255.255.0
      network: 10.0.10.0
      net_name: NatNetwork
    frontend1:
      gateway: 192.168.15.1
      netmask: 255.255.255.0
      network: 192.168.15.0
      net_name: natnet1
  vm_folder: 'F:'
  vm_group: datacenter
  template_box: redhat/rhel-9
host_vars/virtserver.localdomain.yml
Here the deployment host is defined together with the correct parameters for the deployment playbooks(this makes it work).
hostname: virtserver.localdomain
ansible_user: <your windows username here>
ansible_connection: ssh
ansible_shell_type: powershell
primary_interface:
  ip: 192.168.56.1
  network: frontend1
host_vars/testhost1.localdomain.yml
A host to deploy in the developement environment, this is its definition....
architecture: 64bit
hostname: testhost1.localdomain
os:
  name: rhel
  version: 1.0.0
primary_interface:
  ip: 192.168.15.100
  network: frontend1
root_disk_size: 50
size: s
type: vm
hosts.ini
In hosts.ini, we connect the dots....
As you can see a host has a group, which has a group...
This builds layers of vars that are stacked to form a host definition that can be deployed in an automated environment.
[dev]

[dev:children]
vbox8
test_env

[vbox8]
reposerver.localdomain

[vbox8:children]
deploy

[deploy]
testhost1.localdomain
testhost2.localdomain
testhost3.localdomain

[test_env]
aapserver.localdomain
gitserver.localdomain
privatehub.localdomain
virtserver.localdomain
Just be sure that a host must be a member of at least one of the vbox groups, or else the deployment will fail, using the infrastructure plays.
(1) as you can see, I deviated from my own statement to 'NOT' to repeat variable definition
The reason here is readability ( or ignorance ), but this way it is clearer what has changed.
It would be nice to add another layer of grouping here..
Creating rhel box files
a template VM is always a snapshot of a moment in time. deploying such a template is fast...... until you have to update the system.. updating a system which is several months old can take some time and slows down your deployment time.
Therefore you wil need to update the templates regularly.
In short... this is how to do this
I assume You have the template ready in your vbox env, just not started..
before startup
change network settings: - add a secondary adapter on network natnet1
normal start the VM
log in as root
check for ip with the ip a command
allocate temp ip with nmtui in the network range, so you can reach the satellite server add satellite to /etc.hosts
dnf install -y http://satellite/pub/katello-ca-consumer-latest.noarch.rpm --nogpgcheck
subscription-manager register
username: admin
Passwd:
run dnf update
reboot the machine..
update the guest additions..
Remove previous steps
subscripion-manager unregister dnf clean all nmtui remove added address rpm -e katello-ca-consumer-satellite.localdomain-1.0-1 shutdown -h now
in windows command prompt:
vagrant box list vagrant package --base box_rhel8 --output rhel-8-1.box vagrant package --base box_rhel9 --output rhel-9-1.box
vagrant box remove redhat/rhel-8-1 vagrant box remove redhat/rhel-9-1
vagrant box add rhel-8-1.box --name redhat/rhel-8-1 vagrant box add rhel-9-1.box --name redhat/rhel-9-1
vagrant box list
Thats it...
Install rhel satellite
A satellite server is the central maangent/deployment server for enterprise environments based on RedHat Enterprise Linux.
In order to successfully run a satellite server You must have a license. If you are not in a position to buy a license, you better add the install DVD's to the repository server and set satellite_present to false in the inventory.
The virtualmachine to run a satellite server must met the following
minimum requirements:
- memory 16GB
- 4 CPU's
- storage 60GB
- minimum of 300GB extra storage for pulp data
If you have a license and room to spare in your lab... just follow the installation manuals availlable on the internet. For most people this is not economical and a repository server is much more cost effective.
Project deployment ansible code
When installed you can write your own ansible playbooks to deploy almost anything on your host.
Results after configuration and playtime
When you followed the steps in this documentation it could look like the screenshots below. In this lab a full Enterprise like stack is built and running on a game laptop, so I can take it anywhere and play, demo or develop ansible code. For a complete enterprise setup some things are missing like LDAP servers, but with enough resources, anything is possible.
Im my case it runs on Oracle Virtualbox under windows, but it is easily adapted to libvirt under linux, just add a new role to the infrastructure and adapt the inventory accordingly.
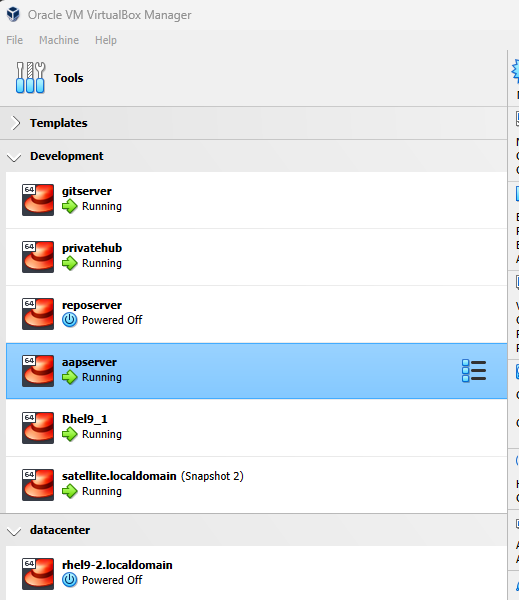
The virtualbox manager screen
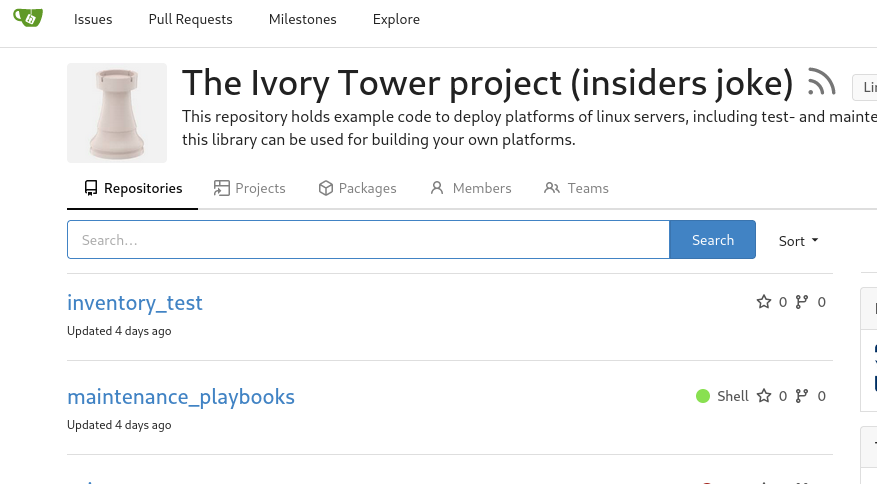
gitea in action
Ansible Atomation Platform home

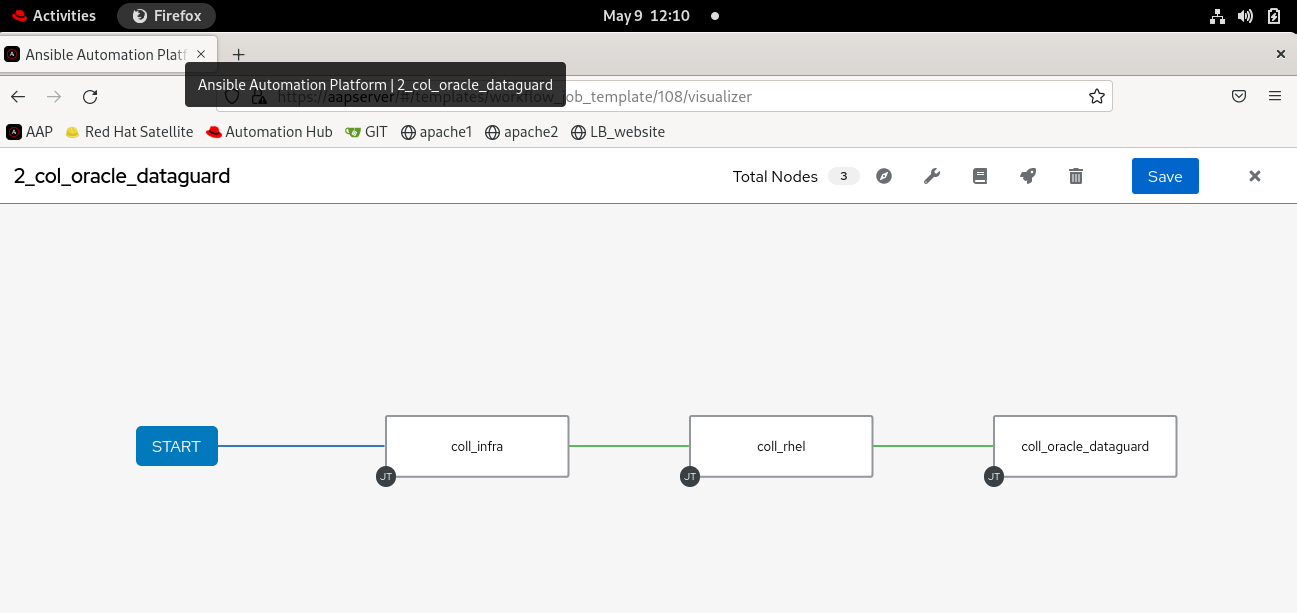
Ansible Automation Platform workflow