Configuring automation platform 2.6
Warning
Version 2.6 of automation platform, as there is a newer release..
Please upgrade to a supported version asap...

The documentation in this section is no longer maintained and will be archived.
Updated: 13-05-2026
The configuration as code works and is correct, but ...
There is an error in the functionality of the infra.aap_configuration collection.
With the move of the RBAC to gateway from hub, some things went wrong.

The error is fixed by redhat in the ansible.hub collection, added a workaround for this.

This involves a new (temporary) file: hub_team_roles.yml
When this is fixed in the infra.aap_configuration collection, this fix will be removed.

New main.yml released for the base configuration, some variable files need to change to use the new main.yml!
  read carefully!

Latest patch release 2.6-8 fully re-installed and configured in just 1 hour.. No errors
This part of the site will tell you how I configured redhat automation platform version 2.6 using configuration as code. As there are stil a number of issues with the configuration, I will describe the way around these issues when possible.
This is the description to setup a configuration as code from scratch for version 2.6 of the automation platform. If you have a different version, find the appropiate version in the main menu.
Bu be aware that these older versions are not maintained, nor updated, they are still on the site as documentation of my configuration as code journey.
But first things first, I need to describe how the configuration that I am making is setup.
Disclaimer:
The configuration code I'll show you is created and functional for my homelab, servernames, credentials and so on are changed for security. There will be no warranty that it will run "as is" on your system.
Do change those parameters accodingly.
This configuration is developed on my homelab and is actually used in an Enterprise, after the development was done and documented here.
I am not allowed to disclose the name of the organization here.
Warning
As this configuration as code is reasonably complex when you have never seen this before. Start with just 1 file at a time and expand from there.
This will give give you the insight on how it works. You can throw it all in there at once, but the amount of errors might overwhelm you.
As configuration as code will restore everything after a disaster, it will take time to run (in a large installation). Configuration as code is a great way to keep everything that is in rhaap secure and recoverable, in case of accidental deletion in the UI (it happens!).
It is not a replacement for backups, a restore from backup is always faster than reinstalling.
When a new release of rhaap is issued, I'll always delete and reinstall the complete setup in my test environment, including running all configuration as code.
rhaap in the organization
Using automation in an Enterprise
Read this about the position of ansible in an Enterpise.
As the rhaap (redhat ansible automation platform) is the heart of your (automation)business, you want it to be secure, and the credentials not being shared by everyone in the organization. You want to be able to separate credentials and other configuration items from teams that do not have a use for them.
Configuration as code is basicly done on a per organization basis, so for each organization there is exactly 1 configuration as code repository.
There are two ways to accomplish this:
Departments configuration and rbac
One way to implement a configuration is to give each department a "Team" in rhaap and set access rights for everything through the rbac model rights.
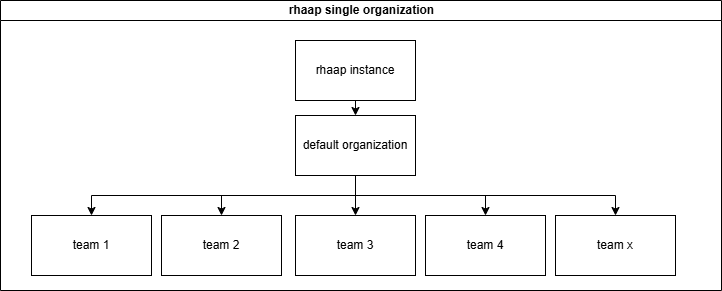
This means in practice that all the configuration is in one repository and the automation team is responsible for it all. This also means that changes are error prone, through communication errors and so on.
This also means that teams cannot be responsible for their own work and how it is configured in rhaap, other that defining it through the UI (defeats the purpose of configurationas code).
This configuration repository will become very large (hundreds of templates and projects) finding errors in a configuration that has thousands of lines is not easy with managers behind you screeming "why is the automation service down?".
It also has a number of advantages, but I will not go into this way of configuring rhaap.
For small businesses, with limited automation needs, this is an option, but automation tends to grow.
Departments will be organizations
The other choice is to give each department its own organization, this implies that (almost) nothing is shared between the teams and this is exactly why these "teams" can be in control of their own configuration.
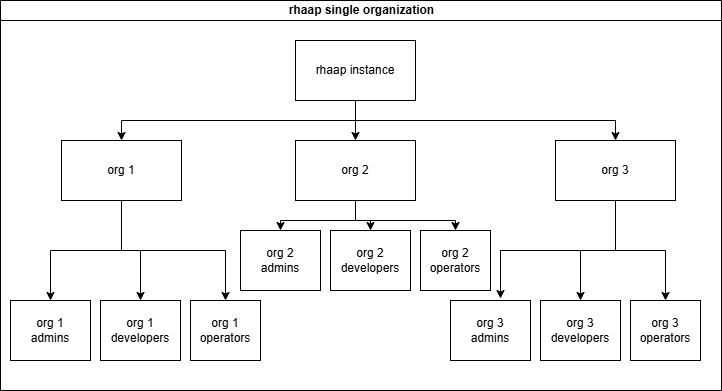
To be in control over your configuration, You need a separate repository for your configuration as code and a separate pileline to configure this into rhaap.
On the other hand, we want the base configuration to be controlled by the automation team and not polluted by user config.
This is exactly what we are going to build in these pages.
We made the following split in the configuration as code:
- The rhaap instance is the base configuration
- Each 'Organization' is a configuration repository in git
- The teams are managed inside the organization, but mapped from LDAP/AD
- RBAC is only needed inside each organization
- As from version 2.5 and up, it is possible to configure usage rights(RBAC) over organizations for objects
- EDA is configured here as an add-on for teams(organizations) that need EDA, and not given by default.
Users are part of Organization teams
Almost every user is mapped through AD/LDAP groups, there are a few exceptions we will discuss later. Access rights are granted through group membership (RBAC).
There are a few usertypes we will see here:
- SystemAdmins (superusers), these are the platform admins they can see and change everything.
- Organization Admins, they can change everything inside the organization they live in.
- Developers, they are granted rights by the organization admin to do their work on projects, templates, inventories and workflows within an organization.
- Operators, they are granted rights by the organization admin to run certain templates.
This is implemented in the documentation you'll find here. When you fully understand how this works, you can implement your own schema of users, or even combine roles to make things even simpler. Be my guest in doing so, it is your configuration.
So if You're interrested, keep on reading.
Gitlab organization
To make full use of the gitlab features we need to use it as the source of thruth for our canfiguration as code, we have to explain how we organized things to make this work.
It all starts with organizing things and structuring it in a way that it is easy to understand, but also to be able to make use af the variable features gitlab gives us. I'll
show you the structure we use in gitlab and why, this is essential for our piplines to run.
The structure of groups and repo's
From the gitlab root we created the following structure:
.
├── common_code
│   ├── cac
│   │   └── pipeline.yml
│   ├── code_dev
│   │   └── pipeline.yml
│   ├── coll
│   │   └── pipeline.yml
│   └── ee
│       └── pipeline.yml
├── configascode
│   ├── base_rhaap
│   └── rhaap_cac_new
└── new_team_group
    ├── project1
    └── project2
The common_code group holds all pipeline scripts that are used in gitlab to keep them central and easily managed, no need to edit 20 repositories to make a minor change to the pipeline. And as the teams do not have acces to the pipeline scripting, some enhanced security against malicius code. This is a public repository where everyone has read access.
The configascode group holds all repositories where the configuration as code is managed, here all the repositories are created for the teams to create their content in automation platform. The reason for this is, that we use variables in the pipeline code to fil-in some blanks we want to manage centrally, so we don't have to edit files in each repository to update the same value. Some of these values are:
- The token to fetch collections from automation hub
- The vault secret to decrypt vaulted values
The new_team_group is essentially the gitlab group where a team has full control to create content like playbooks, roles and other content to run. This might be a already existing repository in gitlab that we do not create, it is listed here for completeness.
variables
vault_password
As every team has its own vault password, this is added as a CICD variable on each configascode subrepository. These passwords are (in our situation) 15 characters long, base64 encodable strings. All secrets in the reppository, must be encrypted with this vault password for the pipleine to run succesfully.
The base64 requirement is chosen, because the CICD variable can be masked in the pipeline logging, so it is not exposed through the pipeline logs.
In this site we will be migrating towards secrets in an external vault, not vaulted in the repository. So some files may change accordingly.
This is initially good enough, later you will want an external vault to host your secrets.
Use an external vault
token
When you want to get collections from your local automation hub, you need a token to access automation hub. To get the token initially, you had to login to automation hub and generate this token in the UI. This token does not expire, but when you use the same user on automation hub to login on the API, this token gets invalid, because the API will regenerate the token for the API session.
We use a separate account in automation hub for this and we do not use this account for anything else, so the token will not be reset. But we need to configure the same token in all repositories, so we pass it as a variable to the pipeline. This vaiable is the same for all repositories/teams. so we add the variable on the group level (configascode).
The token is generated in the config as code and stored in the credential, no more actions needed.
It is advisable to create another separate account, to create a token to use in your ansible.cfg, this is incorporated into the pipeline for the base configurationas code, this will update the ansible.cfg on your automation host. When you need a updated ansible.cfg, copy it from there.
Access to rhaap
Access to the rhaap platform should always be configured in Active Directory or LDAP.
As we want to configure everything automated, there should be a standard structure in either tool to configure the groups in. The easiest is a standard location in AD/LDAP where the groups for access to rhaap are created, like:
ou=rhaap,ou=groups,dc=homelab,dc=wf
So the groups giving acces to the rhaap environments should be created under the above organizational unit. This way we can use this path in the automation as the default path to find the groups in the AD/LDAP.
For the group names themselves, they should be part of a naming convention to be able to map the groups correctly inside the rhaap platform.
The team 'short' name should alway be incorporated into the groupname, like the following example:
- g-rhaap-lnx-a # Admins
- g-rhaap-lnx-d # Developers
- g-rhaap-lnx-o # Operators
So each organization is uniquely named and within this organization there are (in this case) 3 LDAP groups to add users to for this organization. Each group will receive different access levels within the rhaap platform.
Each of these AD/LDAP groups will be mapped to corresponding user groups within the rhaap organization.
g-rhaap-lnx-a is mapped to the group LDAP_LNX_Admins and will recieve organization admin rights
The group names need to have a standard structure, so we can automate the mappings.
Security
For every organization security is important, therefore, we try to design the configuration in such a way that the teams can be as autonomous as possible, while adding the security we need.
Challenge
The most secure server, is a server no human ever logs onto....
As such a production (linux)server has:
- no need for LDAP or AD setup, making it even more secure.
- The only user present is the ansible with sudo rights and key authentication(with passphrase or valid ssh certificate required)
- root can't login through ssh (no known passwd, no key_auth, just sudo from local ansible user)
- system accounts can be present when needed.
All changes are made through automation platform!
For this to work properly, the ansible account must be properly secured and the key must be secured in a way that if its extracted, it is still of no use to the user that extracted it.
Securing the ansible key
If an application needs authentication, then the application must handle LDAP/AD, not the host through PAM.
For most organizations, this is not directly reachable, but it should be this dot on the horizon to reach, as takes away a lot of attack points from hackers.
Steps and separation
We wil expain the steps in which the configuration is build, applied and managed.
First we will build and apply:
- base configuration of gateway and automation hub
- base configuration of controller
- load license from a manifest file
- automation team configuration (is the basis for team configs)
- other teams
- add EDA capability
And last we will automate:
- recovery
- team creation
- team deletion
- execution environment creation
- execution environment deletion
- collection creation
- collection deletion
This is a bold plan, and a lot of work, but since I have allready created the same things for automation platform 2.4 and 2.5, this is merely adapting the same to a new platform structure. The vast changes to the platform do not make this an easy task.
I will try to update this regularly, as I am doing this beside my work.
Advantages of the organizations setup
Configuring rhaap where each team has its own organization has some direct advantages in security:
- Credentials are never shared, unless configured
- Instance groups must be assigned
- Teams have almost full control over their environment in rhaap
- Teams have their own config as code repository for rhaap
- Teams can be end-to-end responsible
Credentials are (almost) never shared
For some credentials you might want them "just being present" and not managed by the team, these are defined in the base_config. Other credentials can be added by the team themselves to be used in their templated and wokflows. The team has full control over credentials in their own repositories.
Instance group must be assigned
Instance groups are part of the global configuration and are owned by the controller. For added security, you can create an execution nodes/pods for a team that can only access the machines that are under the control of this team. Then assign this instance_group to the team in that organization with the use role like:
First create the instance_group through the file group_vars/dev/controller_instance_groups.yml You should do this in the controller_base_config, keeping the control over the instance groups centralized as this is part of security.
---
controller_instance_groups_dev:
  - name: ig_lnx
    instances:
      - rhaap26.homelab
    state: present
Then create a role for each team in that organization to be able to "use" the instance_group.
This is done is the file group_vars/dev/controller_roles.yml in controller_base_config.
---
controller_roles_dev:
  - instance_groups:
      - ig_lnx
    teams:
      - LDAP_LNX_Admins
      - LDAP_LNX_Developers
      - LDAP_LNX_Operators
    organization: ORG_LNX
    role: use
After applying this configuration, users in the organization can see the instance group and add this to their job templates.
And by implementing the configuration specified in these pages, you are on your way to a problem free and secure by design installation.
Security can be tightend more by adding external credential management tools, but that is not the scope of these pages, read the product documentation for this.
EDA controller configuration
The EDA default configuration is created on installation.
In the base configuration we just declare a few things for EDA on a global level:
- decision environments
- eda credential types
In a standard organization config as code repository, there is no eda configuration, the additions to an organization to use eda, will be described in a separate chapter:
add EDA to an organization in config as code
ConfigAsCode
At this point, the foundation for configuration as code is complete. We will now describe in short what we mean by configuration as code:
What is Configuration as Code
If you read the title, you might think that something is being recorded in program code, but of course we don't. It is not given to every administrator to write programs. Configuration as code is a bit of a misleading term these days. Before the infra collection was available, this was of course somewhat correct, because then the ansible code also had to be created to get the configuration into the system. Since the community has made the collection available for this, the latter is no longer necessary, and we only record the content.
You can still ask several questions:
- What exactly do we record?
- Where do we record this?
- How do we record this?
- What do we do this for?
- What can we do with it?
We hope to answer these questions on this site and actually go a step further, by making a statement now:
"why should we backup automation platform?"
We are not going to answer that question, you can do that yourself after reading this site.
In the first instance, we will briefly summarize the answers to the above questions, the substantive and technical treatment will follow in later chapters.
What exactly do we record?
In configuration as code, we actually record everything that exists in terms of content in the automation platform. That is, "Anything we can fill in and click on in the user
interface".
Automation platform 2.6 consists of 4 main components:
- Automation gateway
- Automation hub
- Automation controller
- Event driven ansible controller
For each component, we try to record everything that is part of the configuration in .yaml files, so that we can read it with ansible and load it back into the system via an API, for example. Now that's easier said than done, but here the community has already taken a lot of work off our hands by making the infra collections available, so that we no longer have to create that code to load it. Big thanks to the community.
In this book, we are going to make grateful use of the work that the community has done for us. In the context of "better to copy well than to have to sweat for it ourselves", we also use the community collections and we supplement them with some of our own ansible code plus some pipelines, which we will explain in full on this site.
But we would tell you exactly what we are capturing, there it comes.
Automation gateway
The automation gateway in version 2.6 is the main entrypoint for automation platform and all user configuration has been moved from the separate components to the gateway. This changes the configuration as code a lot since each component had its own user configuration.
In gateway we configure the following:
- Organizations
- Teams
- Users
- Access rights
- Authentication providers
- Team mappings
- User role mappings
- Team role mappings
- Applications
- Ports
Automation Hub
The automation hub is the interface for your internal organization to RedHat and community collections. The automation hub also determines which parts of the redhat and/or community collections will be made available to the internal organization. Your own custom collections and Execution Environments are also stored and managed here. As a rule, an automation hub only exists once per environment (and can be configured to be high available) and the content can also be different per environment. The configuration of the automation hub is made for the benefit of the controller(s) that will be linked to it. This configuration only exists once per environment and is therefore the same for all controllers in that environment.
As already mentioned, we record this configuration data in yaml files and what do they contain:
- What repositories are there (both RedHat, Community and own)
- Which config is synced
- Which (redhat) token is used
- What exactly is synced
- What custom namespaces are there?
- Custom collections
- Execution environments
For the description of the recording of this data, we refer to a later chapter. For a description of how automation hub works, see RedHat's online documentation.
Automation controller
The automation controller is the replacement for its predecessor ansible tower. This is the heart of your automation environment, where playbook runs are started, planned and monitored. Without the controller (or similar platform), there is no real automation environment. For an automation controller, we can define the following for each environment:
- credential types
- credential input sources
- credentials
- execution environments
- hosts
- instance groups
- inventories
- inventory sources
- labels
- Manifest (License)
- notification templates
- projects
- job templates
- roles
- schedules
- settings
- workflows
An automation controller is suitable to be used by multiple teams (organizations), each team can require a different setup with different inventories and credentials. As a result, it is not convenient to record the entire configuration of the controller in 1 set of files. If you want to make AAP users end-to-end responsible, you have to give all users access to the same repository and files, this will not give the desired result and will be a major source of annoyance.
For the above reason, we have split the setup of the controller into several parts:
- Basic configuration
- Team configurations
As you can see later on this site, the basic setup only occurs once, it contains everything that needs to be set up on a global level, such as licenses, superusers, organizations, organization_admin accounts and more. We will discuss the content of this in another chapter.
Event driven ansible controller
Event driven ansible is at the moment of writing rather new. It is used to gather events from monitoring, evaluating the event and then run a playbook(job template) to remediate the cause of the event. This way we can create a self-healing infrastructure.
For the event-driven ansible controller, a collection is now also available to record the configuration in code and then load it. In it, we record the following data:
- credentials
- decision_environments
- projects
- rulebook_activations
For the description of the recording of this data, we refer to a later chapter. For a description of how Event Driven Ansible works, see RedHat's online documentation. On this site, you will find an example project for EDA.
Where do we record this?
In a large IT organization (Enterprise), we want to prevent configuration information from being spread over many systems and/or departments. Traditionally, IT departments within organizations were set up according to silos, where a lot of effort was put into keeping documents and knowledge within the department and hidden from other departments (indispensability principle). Nowadays, fortunately, this is no longer the case, because there are generally no passwords in the documents anymore, fortunately a certain security awareness has ensured that. But it is precisely this fragmentation of knowledge by the organization that has become (almost) fatal for many companies. At the time they were needed, the one who knew 'everything' was no longer employed, it had not been transferred... For these reasons, we really only want one place where the configuration is, a source with the
truth, for which we use a version management system, in this case GIT.
We are talking about the configuration files and not the code. The code is maintained by the community and for that we only have 1 source of truth and that is ansible galaxy. We will come back to this in later chapters, which would be a possible setup for the git repositories, based on gitlab. For other git implementations, it shouldn't be that difficult to rewrite this with the knowledge you have of that git implementation.
How do we record this?
This is the question we want to answer on this site. The code we use to load the configuration enforces the standard here and we have to follow it. What we can do is play around with it before it is picked up by the code. That's what we're going to do on this site. In principle, each part of the configuration will have its own git repository from which the configuration can be pushed from code into the system. How this is structured will be explained in the following chapters.
What do we do this for?
There has never been an infallible system created by humans, so why should we bet that this will be different? That's why we do this, the moment something goes wrong somewhere and the configuration is lost for whatever reason, we need to be able to fix it as quickly as possible. So that the organization is not or hardly inconvenienced by the disruption. As an administrator, you can't explain nowadays that you can't fix a malfunction within a day. For many organizations, there is a major financial loss if the automation environment does not work. So cover yourself (not with excuses, but with recovery code)....
What can we do with it?
As mentioned in the previous section, we can define the configuration and have it pushed into the system via the code. But we've also said that the configuration will be set up in parts. If you then lose all configuration because your system has been completely wiped, you still have a lot of work to do and it also needs to be restored in the correct order. You can already feel it coming, we are going to automate this too, so that as a real IT person we can put our feet on the desk and shout:
"Look Mammy, No hands".
We're going to take you on a journey to automated recovery, as far as that's possible right now.
This should enable you to create a configuration as code for an automation platform 2.6 installation.
There is a lot of work to be done.
First Step in config as code
In the first step we will take one item we will configure like adding "organizations" to the gateway, this is easily done.
We will not create a pipeline yet, yust create the basic code to add the organization to the platform from the command line. In this example, we will configure just one environment, but this is easily extended to the next environment.
requirements
Ensure that the system where we are going to do this has the following installed:
Executables: - python3.11 - ansible-core >= 2.19
Collections: - infra.aap_configuration - ansible.platform
directory structure
Create the folowing directory structure: This is a basic example, a better version is in the next chapter.
.
├── group_vars
│   ├── all
│   │   └── aap_organizations.yml
│   └── dev
│       └── aap_organizations.yml
├── inventory.yaml
├── main.yml
The theory
In the directory structure you see in group_vars there are two directories (can be even more) that holds a file with the same name. This is on purpose, these files are the basis of how we do configuration as code here. The principle that we used to create this is, that we definine everything just once..
The above structure looks like an inventory and will not use it like that, an inventory will overwrite the definitions in all, with the same definitions in dev, forcing us to define things twice when something is in all and we want to keep that in the dev environment. We will create code to add the content of these two files to a single variable, so that we will add these two together and not having to define anything twice. Be aware that if you do define the same item in files that will be added, you will get a 'duplicate key' error.
So in this example, if an organization is present in group_vars/all/aap_organizations.yml, it will get incorporated in every environment. An extra organization that is only present in the "development" environment is added through the definition in the group_vars/dev/aap_organizations.yml
The gateway files
The name of the file is (almost) always the name of the target vaiable, so if the variable for the collection should be "aap_organizations", the filename will be "aap_organizations.yml". As the variable 'aap_organizations' is used in gateway, as wel in controller, this is the only exeption to the above rule, read carefully.
The files placed in the group_vars directories have the same names, but have a slightly different contents, this difference is the basis of what we do:
all/aap_organizations.yml
---
aap_organizations_all:
  - name: ORG_ALL

...
As you can see, there is just the "ORG_ALL" organization name here. As said this organization resides in the "all" group_vars and should be present in every environment.
dev/aap_organizations.yml
The same file, but now for the 'dev' environment.
---
aap_organizations_dev:
  - name: ORG_DEV

...
prod/aap_organizations.yml
Again the same file, now for the 'prod' environment.
---
aap_organizations_prod:
  - name: ORG_PROD

...
Here you can see the difference between these files, when comparing them. the name of the resulting variable is different and this way both are availlable to the ansible playbook that we will be starting to run the configuration. If we would leave the variable names to be equal, we we would have a single variable, holding just the vaule for the "dev" environment, thus losing the "all" value.
The playbook (main.yml)
We will be writing a very basic playbook, where we will not take security into account, so we will have credentials in here, as it is a test and will only be run locally in a test environment.
To get this to work, we must pass the variable 'branch_name' with a value of 'dev' or 'prod' as an extra variable to the playbook.
Never do this in a live environment
---
- name: Configure rhaap platform base
  hosts: "{{ instance | default('localhost') }}"
  connection: local
  gather_facts: false
  vars:
    aap_hostname: https://<fqdn of test platform>
    aap_username: admin
    aap_password: <password>

  tasks:
    # Merge aap_organization_vars
    - name: Set the gateway vars
      ansible.builtin.set_fact:
        aap_organizations: >
          {{ aap_organizations_all |
          community.general.lists_mergeby(vars['aap_organizations_' + branch_name],
          'name', recursive=true, list_merge='append') }}

    - name: Run organization configuration
      ansible.builtin.include_role:
        name: infra.aap_configuration.aap_organizations
This playbook is started using the following command:
ansible-playbook main.yml -i localhost -e branch_name=dev
This playbook has only 2 tasks, the first is to prepare (merge) the variables and secondly to configure the resuting set of variables using the collection into the automation platform specified by the vars in the playbook.
This will:
- merge the variables aap_organizations_all and aap_organizations_dev into aap_organizations
- run the role aap_organizations from the infra.aap_configuration collection
- Both organizations "ORG_ALL" and "ORG_DEV" will be added to the automation platform.
If we would pass the value 'prod' to the playbook, 'ORG_DEV' will not be created, instead 'ORG_PROD' is added to automation platform together with 'ORG_ALL'.
Expand functionality
You can now add more variables to the files, like more organizations or even galaxy credentials to map to the organizations. Or even add new files, with new(other) variables to configure items in autoamtion platform. Do not forget to add files in all group_vars directories and add a merge of the vars to the set_fact in the playbook. Also add a include_role for these files, or change the current include_role to the dispatch role, that will run any role as needed.
Directory structure
The default directory structure is almost the same as (if you read my 2.5 solution) the 2.5 structure, just the contents is a bit different.
.
├── ansibe.cfg
├── group_vars
│   ├── all
│   │   └── yml-files
│   ├── dev
│   │   └── yml-files
│   └── prod
│       └── yml-files
├── host_vars
│   └── aap_dev
│       └── aap_dev.yaml
├── templates
│   └── ansible.cfg.j2
├── inventory.yaml
├── main.yml
└── README.md
Shown above is the global structure of a repository in git that will hold my configuration. It holds some files and directories that contain certain data structures and will be explained later. You'll see 3 directories under group_vars that resemble an inventory, and this is a correct assumption. It looks like an inventory, but not as we know it.
The group_vars now consists of 2 environments 'dev' and 'prod'. In the host_vars the prod is missing, this is intentional during development, so I can't target production even by accident.
This will be added once development has ended.
This is one repository with configuration as code for rhaap2.6, eventually there will be 3 repositories with base code and an extra repository for each team/organization that is enabled in rhaap2.6.
As this is a gitlab repository using a pipeline, something you don't see here, is the .gitlab-ci.yml, the pipeline is configured elsewhere as a security feature. This will also be explained at a later time.
Default files
The files that will be present in all repositories are:
inventory.yml
Is exactly what you think it is, an inventory for the pipeline.
main.yml
This is where the magic happens a ansible playbook that harnesses the configuration as code and applies all tricks to make it functional.
README.md
As all repositories, this one needs a readme of what is in here and what it does and how.
Until now nothing shocking, easy to follow.
This will change
Configuration As Code (CaC) Pipeline
Data & Environments
What we store in the configuration as code is done separately for each environment, so that it will not be the same in all areas. If we do that for the credentials of the automation controller, for example, we can do it as follows:
Statement: "We have 2 automation controller environments"
- dev
- prod
These environments are the first 2 steps of an DTAP set-up and will be treated as such. For these environments, we use 1 git environment as a source of truth.
The credentials contain users and passwords that must be known in the controller for an environment. How exactly these are in it is not that interesting for the story at the moment, but what we do with them in our solution for the configuration as code is. We are trying to explain this clearly here with a simplified example. We have a number of options to capture this data in such a way that it will appear correctly in any environment when the configuration is applied.
There are 4 accounts in the controllers with the same name in all environments, but with different passwords, except the git account, which is the same everywhere (in our situation, this can be different in yours).
| Username | Passwd |
|---|---|
| Git | Imayreadall |
| Ansible | {ssh_key per environment} |
| hub_token | {token per environment} |
| vault_pw | a_vault_password |
| vault_token | A token to access the external vault secrets |
BEWARE!
In this chapter, I will take you along in my journey towards the described solution, so don't start writing code @option 1. Read the full chapter to be able to follow my journey.
Option 1:
We create a repository for each environment on the git server, in the CaC group:
- "CaC/dev_controller_config.git"
- "CaC/"prod_controller_config.git"
In each repository we then create a file credentials.yml in which the above credentials are in the correct yaml format (and not like here in the example). Below is the file in the dev repository:
---
controller_credentials:
  - Name: Git
    Password: Imayreadall
  - name: ansible
    ssh_key: |
      ----start dev key---
      ---end key---

- name: hub_token
    Token: a_token_of_dev_automationhub
  - name: vault_pw
    password: a_vault_password
Below is the file in the test repository:
---
controller_credentials:
  - Name: Git
    Password: Imayreadall
  - name: ansible
    ssh_key: |
      ----start prod key---
      ---end key---

- name: hub_token
    Token: a_token_of_prod_automationhub
  - name: vault_pw
    password: a_vault_password
In each repository there is the same pipeline that reads the configuration and configures it in the controller of that particular environment, the only difference between the pipelines of the two repositories, is the difference in the login data for the controllers. This is a possibility that can work very well, provided you have the administration in order and the working methods are also strictly implemented. If any configuration update is always in all repositories, it will be implemented correctly and emerged. However, this method is complex, labor-intensive and error-prone. In short, not so obvious to use, there must be better ways...
This method can be used with some modification with the
infra.aap_configuration
Option 2:
We only create a repository for the configuration and create folders with the files for the environments based on an inventory structure, so that ansible can read them as such.
.
└── group_vars
    ├── dev
    │   └── credentials.yml
    └── prod
        └── credentials.yml
The content of the files is still the same as it was in the first option, but now you have created a single source of the data, which is managed in one place. To make a change, multiple repositories do not need to be updated. So it has already become simpler and less error-prone. If you also create 2 branches with the names of the environments in this repository, you also have the option to apply the changes per environment in your pipeline. This gives the possibility to test the change in the "dev" environment, before promoting it to the "test" environment. So this set-up already has a number of advantages over the first option.
This method can be used perfectly with the infra.aap_configuration collection, without modifications.
But there is still a lot of data "double" in it, which in turn has a chance of error for differences between the environments. What we would like is for that which must exist in all environments to be defined even once.
What are we going to do:
We're going to use the possibilities of an inventory, but with its own twist (or piece of magic, if you will). The structure remains that of an inventory, but we are going to tinker a bit with the content of the files and the pipeline, before we feed it to the collection in the format that the collection wants.
We extend the folder structure with an "all" folder, which we also see in almost every inventory. That folder also has the same function as the one in an inventory, everything that is here must be everywhere (i.e. in every environment).
.
└── group_vars
    ├── all
    │   └── credentials.yml
    ├── dev
    │   └── credentials.yml
    └── prod
        └── credentials.yml
The directory structure in group_vars above has directories for each environment, there should also be branches in the repository with the same names (excluding all). So the branches in this repository example should be named "dev" and "prod". This is essential for the pipeline. The contents of the files are now different in each folder, we still use the data as specified in the first option, nothing else changes. Below is the file in the group_vars/all folder:
---
controller_credentials_all:
  - Name: Git
    Password: Imayreadall
  - name: vault_pw
    password: a_vault_password
Below is the file in the group_vars/dev folder:
---
controller_credentials_dev:
  - name: ansible
    ssh_key: |
      ----start dev key---
      ---end key---

- name: hub_token
    Token: a_token_of_dev_automationhub
Below is the file in the group_vars/test folder:
---
controller_credentials_prod:
  - name: ansible
    ssh_key: |
      ----start prod key---
      ---end key---

- name: hub_token
    Token: een_token_of_prod_automationhub
Now we have purposely placed these files directly below each other, so that they can easily be compared with each other. We immediately see a difference on the second line, the name of the variable has been given an addition of the folder (or branch). As a result, none of the variables can be used directly for the infra collection, but this is by design.
What is also striking is that the variables that should be the same in all environments are now in the "all" and nowhere else. So there is only 1 version of this variable. The
variables that are environment-specific are in the environment where they belong and nowhere else.
In a complete configuration, think about how much data this would save if all files had this setup.
Anyway, we still have to make this data suitable for the infra collection, otherwise it will be of no use to us. We do that by making the playbook that we call with our pipeline, not just the call to the role:
role: infra.controller_configuration.dispatch
but a pre_task that merges the variables into the desired version:
  set_fact:
    controller_credentials: controller_credentials_all + controller_credentials_[branch]
By passing the branch to the playbook, it is possible to add the correct variable to the all, giving it the full contents of the file in option 1. By not using addition, but doing a merge, it is even possible to change the standard created in the "all" in an environment, by giving variables in the structure a different value. This allows you to make optimal use of the inventory principle. Exactly how this was solved can be read in the pipelines themselves, but the idea is clear.
The variable after the merge with, for example, the "dev" branch:
controller_credentials:
  - Name: Git
    Password: Imayreadall
  - name: ansible
    ssh_key: |
      ----start dev key---
      ---end key---

  - name: hub_token
    Token: a_token_of_dev_automationhub

- name: vault_pw
    password: a_vault_password
This is the structure that has been applied throughout the site, for all variables used through configuration as code. This is the basis of everything that is mentioned and discussed on this site. How does the playbook know which environment to aggregate the variables from? Read on below, where you can find out how the pipeline and the variables work.
GitLab pipelines
What is a pipeline: A gitlab pipeline is a piece of code that is initiated every update (push or merge request) of a repository. We say started here explicitly, because that doesn't mean that anything is done by the code. The configuration and code of a gitlab pipeline is (by default) in a file ".gitlab-ci.yaml". In order for a gitlab pipeline to start, a number of conditions must be met in gitlab:
- A GitLab runner must be configured
A runner has to have all commands you ll use installed on the host or in the container image, depending on the implementation.
- The runner must be linked to the group/project
- The repository should not contain a .gitlab-ci.yaml with the pipeline code, this code should be in a separate project for security reasons.
.GitLab-ci-yaml
The actions performed by a pipeline are located by default in the .gitlab-ci.yaml file in the repository. In this file, we define when which action should be performed. The pipeline is triggered with every update of the repository and depending on the content of the .gitlab-ci.yaml, actions will be performed. In the example below, the gitlab runner that executes this, is on a host (or vm), there is no need for an image tag.
Here's an example:
# List of pipeline stages
stages:
  - Verify ansible code

Verify_ansible_code:
  stage: Verify ansible code
  script:
    - ansible-lint
In this case, the pipeline only has 1 "stage" and it is always executed. The command that executes the pipeline can be found under "script", in this case "ansible-lint". This is about the simplest form of a pipeline that can be made. However, this form also has the greatest risk of performance problems. Because the pipeline is always running with every update, when used by many teams, the runner will quickly be overloaded by the large number of updates. It is therefore more convenient to temper it a bit here.
In the example below the gitlab runner is on a container platform like Kubernetes or docker, hence the image tag is now needed to pull an image.
Another example:
# Defaults
image: docker.homelab:5000/cac-image:latest

# List of pipeline stages
stages:
  - Verify ansible code
only:
  - dev

Verify_ansible_code:
  stage: Verify ansible code
  script:
    - ansible-lint
In the example above, each update starts a new container on OpenShift (this is because the gitlab-runner is implemented there) that is based on the rh-python image. This can also be done on a docker container platform, the operation is exactly the same. However, the image must then be retrieved from another registry. That image is a minimal Linux container with ansible installed in it, so that it is suitable for running ansible code (see elsewhere how these images are created). In this case, we use the same pipeline definition as above, only now we don't always fire it at every update, but only at an update in the "dev" branch, this prevents that when updates to a feature branch or a merge request to, for example, the test environment, the code is not needlessly run through the linting again. By combining different stages, one can Create a highly complex pipeline that can perform many tasks automatically.
In the above example a cac-image is used.
To create the (docker)image, see here: cac-image
The keywords "stage" and "script" are reserved words in a gitlab pipeline definition. Multiple stages can be created and dependencies between stages can be determined. There are too many possibilities to describe here. All documentation can be found on the gitlab.com website. We're going to show another version of the pipeline, and that's the one we use for most repositories. With the knowledge gained here, all the pipelines in this book can be read and explained.
A more advanced pipeline is below:
We've talked about DTAP before. We therefore want this order to be enforced in the pipeline, where necessary. In order to enforce this sequence in the pipeline completely correctly and only perform a merge upon successful execution, a number of settings in gitlab need to be adjusted compared to the default settings. Also, for an Enterprise environment, at least a premium/Enterprise version is required.
configure_from_merge
In the event of an update to the git repository where this pipeline is located, the pipeline will be triggered, but will not do anything when creating a new (feature) branch. Only when the new branch is brought to the dev branch via a merge request, the code will be executed after the merge button is pushed. A specific order is not really enforced here, but the pipeline is only run on the commit after a merge request.
The advised sequence should be this:
- New branch to dev
- From dev to test
- From test to accp
- From accp to prod
configure_from_trigger
The code that is here is not executed during a code update, but under another condition, which we will come back to later in the chapter recovery.
# Pull the ansible config as code image
image: docker.homelab:5000/cac-image:1.3

# List of pipeline stages
stages:
 - Configure automation-platform

configure_from_merge:
  tags:
    - shared
  stage: Configure automation-platform
  rules:
    - if: '($CI_COMMITT_BRANCH == "dev" ||
            $CI_COMMITT_BRANCH == "test" ||
            $CI_COMMITT_BRANCH == "accp" ||
            $CI_COMMITT_BRANCH == "prod") &&
            && $CI_PIPELINE_SOURCE == "push" &&
            && $CI_COMMIT_MESSAGE =~ /Merge branch/i'
  script:
    - echo "From pipeline - Start rhaap configuration on '$CI_COMMIT_BRANCH' Environment"
    - ansible-playbook main.yml
      -i inventory.yaml
      -e instance=aap_$CI_COMMIT_BRANCH
      -e branch_name=$CI_COMMIT_BRANCH
      -e vault_url='<url-to-vault-server>'
      -e vault_token=${VAULT_TOKEN}
      -e org_name=${ORG_NAME}

configure_from_trigger:
  tags:
    - shared
  stage: Configure automation-platform
  rules:
    - if: '$CI_PIPELINE_SOURCE == "pipeline"'
  script:
    - echo "Pipeline triggered by '$CI_PIPELINE_SOURCE' ref"
    - echo "From pipeline - Start controller recovery on '$CI_COMMIT_REF_NAME' Environment"
    - ansible-playbook main.yml
      -i inventory.yaml
      -e instance=aap_$CI_COMMIT_REF_NAME
      -e branch_name=$CI_COMMIT_REF_NAME
      -e vault_url='<url-to-vault-server>'
      -e vault_token=${VAULT_TOKEN}
      -e org_name=${ORG_NAME}
What you could notice (if you look closely) is that the script sections are slightly different in detail. We are going to explain one of the two, the other you should be able to read with the explanation of the first. Some of the variables used are different, this is because of the time at which the code is executed. Let's take the bit aside for a moment, that's a bit clearer:
  script:
    - echo "Pipeline triggered by '$CI_PIPELINE_SOURCE' ref"
    - echo "From pipeline - Start rhaap recovery on '$CI_COMMIT_REF_NAME' Environment"
    - ansible-playbook main.yml
      -i inventory.yaml
      -e instance=aap_$CI_COMMIT_REF_NAME
      -e branch_name=$CI_COMMIT_REF_NAME
      -e vault_url='<url-to-vault-server>'
      -e vault_token=${VAULT_TOKEN}
      -e org_name=${ORG_NAME}
This is the part of the pipeline that does the actual work, all that remains is the prerequisite. We'll first explain the variables in each part of the pipeline, which will make things a lot clearer.
| Variable name | origin | Definition |
|---|---|---|
| CI_COMMIT_REF_NAME | gitlab commit | This is always filled by gitlab itself when pushing/merging to a branch |
| CI_MERGE_REQUEST_TARGET_BRANCH_NAME | gitlab merge | In the case of a merge request, this variable has the name of the target branch in it |
| CI_MERGE_REQUEST_SOURCE_BRANCH_NAME | gitlab merge | In the case of a merge request, this variable contains the name of the origin branch |
| CI_PIPELINE_SOURCE | GitLab CI/CD | This variable indicates the source of a pipeline run, which can be a merge request, push or a pipeline event |
| VAULT_TOKEN | GitLab CI/CD | This variable is defined on the group level and holds the access token for openbao server |
| ORG_NAME | GitLab CI/CD | This variable is defined on repository level and holds the organization part of the namespace |
Are we going to replace the variable with their values in the code "as if we were the pipeline", this gives the following result:
echo "Pipeline triggered by 'dev' ref"
echo "From pipeline - Start rhaap recovery on 'dev' Environment"
ansible-playbook main.yml -i inventory.yaml -e instance=aap_dev -e branch_name=dev
 -e vault_url='http://hashivault.homelab:8224' -e vault_token='blahblahblah' -e org_name='linux'
Then, all of a sudden, it seems like a simple piece of bash code generated by the pipeline, and in the end, it is.
In each chapter the pipeline is repeated a bit, if you understand what has been explained above, you can skip it in most cases.
That's all you need in terms of pipeline knowledge, with the examples shown above it is possible to capture many automation questions in a pipeline. At least as far as ansible automation platform is concerned and much more.
Base configuration for Automation Platform
Before we can use the just installed automation platform 2.6, we need some configuration to be present.
We could just login as the admin user and start clicking, but do you want to do this in the middle of the night, in case of a crash?
I think not.
To load the initial configuration in Automation Platform, we might need the following files:
aap_applications.yml
aap_organizations.yml
aap_teams.yml
aap_user_accounts.yml
gateway_authenticator_maps.yml
gateway_authenticators.yml
gateway_http_ports.yml
gateway_role_team_assignments.yml
gateway_role_user_assignments.yml
gateway_routes.yml
gateway_service_clusters.yml
gateway_service_keys.yml
gateway_service_nodes.yml
gateway_services.yml
gateway_settings.yml
hub_collection_remotes.yml
hub_collection_repositories.yml
hub_collections.yml
hub_ee_images.yml
hub_ee_registries.yml
hub_ee_repositories.yml
hub_namespaces.yml
hub_team_roles.yml
controller_credentials_input_sources.yml
controller_credential_types.yml
controller_credentials.yml
controller_execution_environments.yml
controller_hosts.yml
controller_instance_groups.yml
controller_inventory.yml
controller_inventory_sources.yml
controller_labels.yml
controller_notification_templates.yml
controller_organization.yml
controller_projects.yml
controller_roles.yml
controller_schedules.yml
controller_settings.yml
controller_templates.yml
controller_workflows.yml
eda_credential_types.yml
eda_decision_environments.yml
You'll see that the files are named aap.., gateway..., hub..., controller... or eda this is ofcourse a dead giveaway of whats in there. For the contents of each of these files, you can refer to the documentation on github for the infra.aap_configuration project. The documentation of the parameters can be found in the roles documentation of each role. The files we add have the names of the variables they hold, not the rolenames in the collection!
I will explain each file as we progress on our configuration journey.
Important
If you don't configure anything in a certain file, don't create it!
But if a file is used in an environment, ensure that it exists in all environments!
First we wil look back on the directory structure we have shown you before, but only the part we need at the moment:
.
├── group_vars
│   ├── all
│   │   └── yml-files
│   ├── dev
│   │   └── yml-files
│   └── prod
│       └── yml-files
The files we see above are placed in each of the group_vars directories, so each directory will hold the same filenames (content is different!).
the same filenames need to be present in every directory, or else the code will fail.
As you see, the group_vars looks like an inventory, and it basically is, but the thing with inventories is, they tend to overwrite variables.
This is not what we want, so the content of the files is slightly different, so the vaiables aren't overidden. I hear you asking why and I will tell you.
We don't want to define things twice, ever.
So if we define things in "ALL" we want to be present in all of our environments, but if this where an inventory, as soon as we define somenthing in the same file in dev, we must copy all contents from the "ALL" file to dev AND prod. So that doubles our maintenance for that file.
If we slightly differ the variable names in the files and let the code merge the variables, then the all is still all and merges with the correct environment.
Less copying, less maintenance and easier management.
This is the essence of the configuration as code as I built it.
All code is tested on the homelab, described here Lab_on_Proxmox.
Not all services of the Automation Platform will be configured, only those we need to make it functional.
Once you have mastered this, you can figure the rest out.
Adding the first file
If you read the previous section carefully and have nothing to configure here, don't create the file, but read the documentation anyway.
We start by adding the first file to the shown structure and configure the values in them, if needed. The first file on the file_list is "aap_applications.yml'. The structure is now as seen below:
.
├── group_vars
│   ├── all
│   │   └── aap_applications.yml
│   ├── dev
│   │   └── aap_applications.yml
│   └── prod
│       └── aap_applications.yml
Now we will show you the content of each file:
group_vars/all/aap_applications.yml
As we do not configure extra application in rhaap, this file is an empty set.
---
aap_applications_all: []
  # - name: "gateway Config Default Application"
  #   description: "Generic application, which can be used for oauth tokens"
  #   organization: "Default"
  #   state: "present"
  #   client_type: "confidential"
  #   authorization_grant_type: "password"
...
But you can already see that the variable name used here has the "_all" extension, so the variable will not be overridden as this is not quite a inventory.
Why we do this, will become clear in a moment.
group_vars/dev/aap_applications.yml
As we do not configure extra application in rhaap, this file is an empty set.
---
aap_applications_dev: []
  # - name: "gateway Config Default Application"
  #   description: "Generic application, which can be used for oauth tokens"
  #   organization: "Default"
  #   state: "present"
  #   client_type: "confidential"
  #   authorization_grant_type: "password"
...
Here the variable has the "_dev" extension, so the variable will not be overridden.
group_vars/prod/aap_applications.yml
As we do not configure extra application in rhaap, this file is an empty set.
---
aap_applications_prod: []
  # - name: "gateway Config Default Application"
  #   description: "Generic application, which can be used for oauth tokens"
  #   organization: "Default"
  #   state: "present"
  #   client_type: "confidential"
  #   authorization_grant_type: "password"
...
Here the variable has the "_dev" extension, so the variable will not be overridden.
Variable handling
When we run our playbook to start the configuration for the "dev" environment, the play wil have the following variables availllable form the above "inventory":
- gateway_applications_all
- gateway_applications_dev
In main.yml the merge of the variables is done by this piece of (example)code:
    - name: Set the gateway vars
      ansible.builtin.set_fact:
        aap_applications: >
          {{ aap_applications_all |
          community.general.lists_mergeby(vars['aap_applications_' + branch_name],
          'name', recursive=true, list_merge='append') }}
This results in the aap_applications variable the collection needs.
The collection infra.aap_configuration does not know of these variables and will not even try to confgure the rhaap2.5 environment.
So how do we get the correct variable to feed to the collection? What we don't want is to write everything twice or more. So wel will everything that must exist in all environments into the "..._all" variable and only the specific items for dev in the "..._dev" variable.
Then if we merge the 2 variables into the gateway_applications variable, before we call the infra collection, all will beconfigured correctly.
How we do this exactly, we will axplain later, first we will add and configure more files.
More files
Below a list of possible configuration files, there are more, but these are the most used. Not all files need to be created, only the ones that are actually used. When a file is created and filled, it must be present in all directories where configuration is defined, so if you create a file in 'dev' it must be present in 'all' and any other environment directory. Ensure files contain the correct content, described below.
aap_organizations.yml
aap_teams.yml
aap_user_accounts.yml
gateway_authenticator_maps.yml
gateway_authenticators.yml
gateway_http_ports.yml
gateway_organizations.yml
gateway_role_team_assignments.yml
gateway_role_user_assignments.yml
gateway_routes.yml
gateway_service_clusters.yml
gateway_service_keys.yml
gateway_service_nodes.yml
gateway_services.yml
gateway_settings.yml
hub_collection_remotes.yml
hub_collection_repositories.yml
hub_collections.yml
hub_ee_images.yml
hub_ee_registries.yml
hub_ee_repositories.yml
hub_namespaces.yml
hub_team_roles.yml
controller_credentials_input_sources.yml
controller_credential_types.yml
controller_credentials.yml
controller_execution_environments.yml
controller_instance_group_roles.yml
controller_hosts.yml
controller_instance_groups.yml
controller_inventory.yml
controller_inventory_sources.yml
controller_labels.yml
controller_license.yml
controller_notification_templates.yml
controller_organization.yml
controller_projects.yml
controller_roles.yml
controller_schedules.yml
controller_settings.yml
controller_templates.yml
controller_workflows.yml
eda_credential_types.yml
eda_decision_environments.yml
Not all files have to be configured, before you can run the pipeline code, the pipeline will run fine in most cases.
If you did all the above, follow me to the code..
The code in the repository
As we created the directory structure to hold the configuration files we dicussed above this, we need to add the host_vars directories.
It may be obvious what goed in there, but anyway..
We expand the structure above with the following structure and start filling in the files to make things functional.
── host_vars
│   ├── aap_dev
│   │   ├── aap_auth.yml
│   │   └── aap_dev.yml
│   └── aap_prod
│       ├── aap_auth.yml
│       └── aap_prod.yml
├── inventory.yaml
└── main.yml
host_vars/aap_dev/aap_auth.yml
In this file we place the authentication variables to be able to login to the freshly installed rhaap (so it will be the admin account).
When using a ansible vaulted approach:
---
aap_hostname: 'https://rhaap26.homelab'
aap_validate_certs: false
aap_username: admin
aap_password: !vault |
          $ANSIBLE_VAULT;1.1;AES256
          62376235356630323466653639303235366562393632613031303630643564656535306264633634
          3133616538333963663961656631326164343534366538630a623665663764373838383838333335
          64386531356335303439643132663561383166656166613232323537336565323562633765363435
          3063343531383132650a613834653466623166656264393731366262616661353562336330373437
          3963
cloud_token: '<your_cloud_token_here>' # noqa: yaml[line-length]
cfg_hostname: rhaap26.homelab
cfg_password: !vault |
          $ANSIBLE_VAULT;1.1;AES256
          562376235356630323466653639303235366562393632613031303630643564656535306264633634
          31583016538333963663961656631326164343534366538630a623665663764373838383838333335
          643865361356335303439643132663561383166656166613232323537336565323562633765363435
          30633435531383132650a613834653466623166656264393731366262616661353562336330373437
          3963
When using a external vault approach:
All secrets are defined in the external vault.
We remove this file and add a small piece of code to the top of main.yml
You may have read that the cloud_token is defined elsewhere... here it is.. just once per environment. The cfg_hostname is for the main.yml playbook, to define the host to write the ansible.cfg to. The cfg_password is the password of the user defined to write the ansible.cfg (in my case 'ansible').
host_vars/aap_dev/aap_dev.yml
Some vars for the collections to make things run smooth.
Added the url to the manifest here, this is the manifest that the playbook will download and install.
---
hostname: localhost
aap_configuration_async_retries: 50
aap_configuration_async_delay: 5
aap_request_timeout: 60
manifest_url: "http://<webserver_url>/manifest_rhaap.zip"
...
The production branch of the host_vars holds the same files, with other values, siutable for the production environment.
inventory.yml
This file is important, but so simple.. just copy this:
---
dev:
  hosts: aap_dev
prod:
  hosts: aap_prod
the real code main.yml
The file main.yml is almost the same in every repository for configuration as code. Just the variables vary. The only exeption is the one here, it must adapt for the workaround in team_role_assignments.
Updated: 23-04-2026

Full code revision...
The code is rewritten to make it easier to implement some changes:
  - now we can add new variable files to the repository and they will be picked up
  - ensure variable files have the names of the variable they hold
  - useless workarounds removed (as they were fixed)
  - less code
We have split the play into the following parts:
- pre_tasks
- roles
- tasks
We will explain why:
The main reason is that we want gateway and hub configured first, when theprivatehub is configured, we can automaticly create a token thatwecan use in ansible.cfg. This token is also used in the galaxy credentials that will be added to each organization in rhaap. This ensures, that any organization in rhaap can use the collections in privatehub, right from the start.
pre_tasks
In the pre_tasks, we merge all variables we need to run the first part of the configuration, so that the organizations are defined and have their id. We set the aap_configuration_dispatcher_roles variable to the first part of our own creation.
We search the group_vars directory for files with names starting with 'gateway_.yml' or 'hub_.yml', these are the first items we will configure in the first run of the infra.aap_configuration collection.
roles
For simplicity, we just call the infra.aap_configuration.dispatch role and with the variable modified, it runs just a few roles and stops where we need it to.
tasks
Here we first merge and prepare the rest of the variables for the configuration. In 2.5 we had to add some tasks to ensure the mappings of the organization worked correctly, this is no longer needed. The last task is running the dispatch role and letting it finish.
In the last part of the main.yml, we generate a new ansible.cfg and upload it to a webserver, here developers can always find an up-to-date ansible.cfg for developers and pipelines.
Preparation for recovery
Configuration as code is ment to be able to recover from a disaster, this is no different for the automation platform. We do not want to spend a lot of time doing this, we want to recover without doing a lot of steps or manual work. The way we built the configuration, with everything split into manageable parts, leaves us with a lot of repositories that we must run through the pipeline to restore everything.
To be able to run this in just one job, we must prepare..
For rebuiding the execution environments, we need a current ansible.cfg to be able to install collections during the build. So we add a little code to this playbook to create the ansible.cgf during each run on the automation platform server.
---
- name: Configure rhaap platform base
  hosts: "{{ instance | default('localhost') }}"
  connection: local
  gather_facts: false
  vars:
    vault_url: <vault service url>

  pre_tasks:
    # The workaround changes the order for the default role_list in the dispatch role
    # Not only the order is fixed, but also the complete list is split into 2 lists
    # so we can do some tasks in between to fix things
    - name: Include temporary workaround vars
      ansible.builtin.include_vars:
        file: workarounds.yml

    # fetch the configuration admin credentials from the external secrets vault (openbao in our case)
    - name: Get secrets
      community.hashi_vault.vault_kv2_get:
        url: "{{ vault_url }}"
        token: "{{ vault_token }}"
        namespace: "{{ branch_name }}/{{ org_name }}"
        engine_mount_point: kv
        path: "rhaap_admin"
      register: secrets
      no_log: true

    - name: Set rhaap facts
      ansible.builtin.set_fact:
        aap_hostname: "{{ secrets['secret']['hostname'] }}"
        aap_username: "{{ secrets['secret']['username'] }}"
        aap_password: "{{ secrets['secret']['password'] }}"
        aap_validate_certs: "{{ secrets['secret']['validate_certs'] }}"
        ah_hostname: "https://{{ secrets['secret']['fqdn'] }}"
        ah_validate_certs: "{{ secrets['secret']['validate_certs'] }}"
        ah_username: "{{ secrets['secret']['username'] }}"
        ah_password: "{{ secrets['secret']['password'] }}"
        cloud_token: "{{ secrets['secret']['cloud_token'] }}"
        cfg_hostname: "{{ secrets['secret']['fqdn'] }}"
        cfg_password: "{{ secrets['secret']['password'] }}"
        cfg_redhat_subscription_username: "{{ secrets['secret']['rh_sub_username'] }}"
        cfg_redhat_subscription_password: "{{ secrets['secret']['rh_sub_password'] }}"
      no_log: true

    # Set the first set of vars for the dispatch role to configure the Gateway
    # Hub and controller will follow in the next steps
    # first we fetch the list of local users for the organizations from the vault
    # and create the gateway_user_accounts variable
    # These users are stored in one secret "base_users" in the secrets vault, the key/value pairs
    # are the username and password for that user, so this one secret holds the complete list of
    # local users on the gateway without the security risk of pushing them into a git repository.
    - name: Read secrets from vault
      ansible.builtin.uri:
        url: "{{ vault_url }}/v1/kv/data/base_users"
        method: GET
        headers:
          X-Vault-Token: "{{ vault_token }}"
          X-Vault-Namespace: "{{ branch_name }}/{{ org_name }}"
          Content-type: "application/json"
        timeout: 10
        validate_certs: false
      register: rsecret

    - name: Set the content var
      ansible.builtin.set_fact:
        _content: "{{ rsecret['json']['data']['data'] }}"
        aap_user_accounts: []

    - name: Create gateway_users variable from vault
      ansible.builtin.set_fact:
        aap_user_accounts: "{{ aap_user_accounts + [{'username':  user.key, 'password': user.value, 'update_secrets': 'false', 'email': '' }] }}"
      loop: "{{ _content | dict2items }}"
      loop_control:
        loop_var: user

# Set the first set of vars for the dispatch role to configure the Gateway
    # Hub and controller will follow in the next steps
    - name: Set the gateway and hub vars
      ansible.builtin.set_fact:
        configure_hub: "{{ run_hub_config | bool }}"
        aap_configuration_secure_logging: false
        ee_image_push: true
        ee_validate_certs: false
        ee_create_ansible_config: false

    - name: Find var files for gateway and hub
      ansible.builtin.find:
        paths: "group_vars/{{ branch_name }}"
        patterns:
          - 'gateway_*.yml'
          - 'aap_*.yml'
          - 'hub_*.yml'
      register: _gtw_files

    # Itterate through the file list and use the filenames as variable names to add the
    # 'all' and 'target env' variables together
    - name: Create the vaiables for configuration as code
      ansible.builtin.set_fact:
        "{{ (filegtw.path | basename | splitext | first) }}": |
          {{ lookup('vars', *[filegtw.path | basename | splitext | first + '_all', filegtw.path | basename | splitext | first + '_' + branch_name] )|flatten }}
      loop: "{{ _gtw_files.files }}"
      loop_control:
        loop_var: filegtw
        label: "{{ filegtw.path }}"

    # As the collection is not consistent using lists of dicts, we need to create this ourselves
    - name: Create the gateway_settings dict, this differs from controller settings
      ansible.builtin.set_fact:
        gateway_settings: "{{ gateway_settings_all |  combine(vars['gateway_settings_' + branch_name]) }}"
      when: gateway_settings is defined

    - name: Set the role-list to run first
      ansible.builtin.set_fact:
        aap_configuration_dispatcher_roles: "{{ gateway_configuration_dispatcher_roles + hub_configuration_dispatcher_roles }}"

  roles:
    - infra.aap_configuration.dispatch

  tasks:
    # Apply a workaround for the infra collection not mapping hub roles
    # using the hub_team_roles variable
    - name: Apply the hub roles when defined
      ansible.hub.team_roles:
        team: "{{ _hub_role.team }}"
        role: "{{ _hub_role.role }}"
        state: "{{ _hub_role.state | default(present) }}"
        ah_host: "{{ secrets['secret']['fqdn'] }}"
        validate_certs: "{{ secrets['secret']['validate_certs'] }}"
        ah_username: "{{ secrets['secret']['username'] }}"
        ah_password: "{{ secrets['secret']['password'] }}"
      loop: "{{ hub_team_roles }}"
      loop_control:
        loop_var: _hub_role
      when: (hub_team_roles is defined) and (hub_team_roles | length > 0)

    # Generate a hub token to use for the galaxy credentials in controller
    # This token is not echoed, so for use in ansible.cfg, you must use a new account
    # and create a token for that account after configuration.
    - name: Create a new token using username/password
      ansible.hub.ah_token:
        state: present
        ah_host: "{{ aap_hostname }}"
        ah_username: coll_get
        ah_password: "{{ _content['coll_get'] }}"
        validate_certs: false
      no_log: true

    # Create the set of variables to configure the controller
    - name: Set the controller vars
      ansible.builtin.set_fact:
        aap_configuration_secure_logging: false

    # We exclude the license vars here, it is the only one that must be a dict
    - name: Find var files for controller and eda
      ansible.builtin.find:
        paths: "group_vars/{{ branch_name }}"
        patterns:
          - 'controller_*.yml'
          - 'eda_*.yml'
        excludes: '*_license.yml'
      register: _ctl_files

    - name: Create the vaiables for configuration as code
      ansible.builtin.set_fact:
        "{{ (filectl.path | basename | splitext | first) }}": |
          {{ lookup('vars', *[filectl.path | basename | splitext | first + '_all', filectl.path | basename | splitext | first + '_' + branch_name] )|flatten }}
      loop: "{{ _ctl_files.files }}"
      loop_control:
        loop_var: filectl
        label: "{{ filectl.path }}"

    - name: Correct the var name for stage 2 controller configuration
      ansible.builtin.set_fact:
        aap_organizations: >
          {{ controller_organizations }}
      when: controller_organizations is defined

    - name: Set the role-list to run second stage
      ansible.builtin.set_fact:
        aap_configuration_dispatcher_roles: "{{ controller_configuration_dispatcher_roles + eda_configuration_dispatcher_roles }}"

    # As the license install is not in the dispatch module, we run it ourselves
    - name: Create the license variable
      ansible.builtin.set_fact:
        controller_license: >
          {{ controller_license_all | combine(vars['controller_license_' + branch_name]) }}
      when:
        - controller_license_all is defined
        - ('controller_license_' + vars['branch_name']) is defined

    - name: Install license when defined
      ansible.builtin.include_role:
        name: infra.aap_configuration.controller_license
      when: controller_license is defined

    - name: Run second part of the base config
      ansible.builtin.include_role:
        name: infra.aap_configuration.dispatch

    # Apply a workaround for the infra collection not mapping instance_group roles
    # using the controller_roles variable
    - name: Apply the controller roles when defined
      ansible.controller.role:
        teams: "{{ _controller_role.teams }}"
        role: "{{ _controller_role.role }}"
        instance_groups: "{{ _controller_role.instance_groups }}"
        state: "{{ _controller_role.state }}"
        controller_host: "{{ secrets['secret']['fqdn'] }}"
        validate_certs: "{{ secrets['secret']['validate_certs'] }}"
        controller_username: "{{ secrets['secret']['username'] }}"
        controller_password: "{{ secrets['secret']['password'] }}"
      loop: "{{ controller_instance_group_roles }}"
      loop_control:
        loop_var: _controller_role
      when: controller_instance_group_roles | length > 0

    # The code added here is to create a current ansible.cfg with the correct token
    # for the current itteration of the rhaap platform, we need this for recovery.
    - name: Set token_var to pass to ansible.cfg
      ansible.builtin.set_fact:
        ansible_token: "{{ ah_token['token'] }}"

    # We write a current ansible.cfg to the server
    # we will be using this for subsequent (EE) pipelines during recovery.
    - name: Prepare to pass the ansible.cfg to the host
      ansible.builtin.add_host:
        groups: rhaap_server
        hostname: "{{ cfg_hostname }}"
        ansible_user: ansible
        ansible_password: "{{ lookup('community.hashi_vault.hashi_vault', 'secret=kv/data/rhaap_admin:cfg_password }}"

- name: Write ansible.cfg
  hosts: rhaap_server
  # As the pipeline image has no ansible keys setup, we must disable keychecking
  vars:
    ansible_ssh_common_args: '-o StrictHostKeyChecking=no'
    vault_url: <vault service url>
  tasks:

    - name: Set token_var to pass to ansible.cfg
      ansible.builtin.set_fact:
        ansible_token: "{{ hostvars['aap_dev']['ansible_token'] }}"

    - name: Template the new ansible.cfg
      ansible.builtin.template:
        src: ansible.cfg.j2
        dest: /etc/ansible/ansible.cfg
        mode: '0644'
        owner: root
        group: root
      become: true

   # The task below writes a current version of ansible.cfg to a webserver
   # where pipelines and developers can pick it up without having to modify the repositories
    - name: Get the collection download secret
      community.hashi_vault.vault_kv2_get:
        url: "{{ vault_url }}"
        token: "{{ vault_token }}"
        namespace: "{{ branch_name }}/{{ org_name }}"
        engine_mount_point: kv
        path: "website_owner"
      register: _wo_secret
      no_log: true

   - name: Template the new ansible.cfg to webserver
      ansible.builtin.template:
        src: ansible.cfg.j2
        dest: "/var/www/localhost/htdocs/{{ branch_name }}_ansible.cfg"
        mode: '0644'
        owner: ansible
        group: ansible
      delegate_to: <webserver_fqdn>
      vars:
        ansible_ssh_user: "{{ _wo_secret['secret']['username'] }}"
        ansible_ssh_password: "{{ _wo_secret['secret']['password'] }}"
Add organization
Now we have a base configuration, want to start adding additional organizations to this to be able to utilize the platform as it is intended. Adding an organization to this configuration will need changes to the base configuration as described earlier. Before we can automate the addition of a new team, we must know how to do this by hand. In this part of the configuration description, we will be adding the NEW organization, so anywhere you see NEW, this points to the organization name.
Analyse changes
The first thing we have to do is analyse which files arer changed to add a team. The second step is to describe what changes we made to every file in the complete configuration (for base- and controller). These changes will be crucial to implement a new team.
Base gateway config changes
This configuration part is in a separate repository(rhaap_config_part_1), so it must be handled as such.
There are organization specific changes in the following files in alphabetical order:
- gateway_authenticator_maps.yml
- gateway_organizations.yml
- gateway_role_user_assignments.yml
- gateway_teams.yml
- gateway_users.yml
As the automation hub is managed by the automation team, no roles have to be mapped here.
Base controller config changes
This cofiguration is in a separate repository(rhaap_config_part_2), so it must be handled as such. In this configuration we need to make certain changes to give the new organization access to some credentials, therefore the following files need to be changed:
- controller_credentials.yml
Here the pull secrets for the automation hub are configured centrally, so if they are changed, the change can be managed centrally, whithout changing the configuration of all organizations.
Changes to base config by files
Now we know which files were modified, we need to know what the changes are.
gateway_authenticator_maps.yml
As the configuration of most AD/LDAP servers is global to the entire environment, the most likely place to add this is in the "ALL" branch.
For the NEW organization, the following must be added to the file:
We standardized the naming of the groups in AD/LDAP, so we can generate the group names from the team name in automation platform. This reduces the need for extra parameters added to the survey of the play later on.
# # BEGIN BLOCK ORG_NEW ANSIBLE MANAGED BLOCK ORG_NEW
  - name: ORG_NEW-members
    authenticator: Auth LDAP container
    revoke: true
    map_type: organization
    organization: ORG_NEW
    role: Organization Member
    triggers:
      always: {}
      never: {}
      groups:
        has_and:
          - cn=ug-new,ou=groups,dc=homelab,dc=wf

  - name: ORG_NEW-admins
    authenticator: Auth LDAP container
    revoke: true
    map_type: organization
    organization: ORG_NEW
    role: Organization Admin
    triggers:
      always: {}
      never: {}
      groups:
        has_and:
          - cn=g-aap-new-a,ou=groups,dc=homelab,dc=wf

  - name: ORG_NEW-admin-team
    authenticator: Auth LDAP container
    revoke: true
    map_type: role
    organization: ORG_NEW
    team: LDAP_NEW_Admins
    role: Team Member
    triggers:
      always: {}
      never: {}
      groups:
        has_and:
          - cn=g-aap-new-a,ou=groups,dc=homelab,dc=wf

  - name: ORG_NEW-D
    authenticator: Auth LDAP container
    revoke: true
    map_type: team
    organization: ORG_NEW
    team: LDAP_NEW_Developers
    role: Team Member
    triggers:
      always: {}
      never: {}
      groups:
        has_and:
          - cn=g-aap-new-d,ou=groups,dc=homelab,dc=wf

  - name: ORG_NEW-O
    authenticator: Auth LDAP container
    revoke: true
    map_type: team
    organization: ORG_NEW
    team: LDAP_NEW_Operators
    role: Team Member
    triggers:
      always: {}
      never: {}
      groups:
        has_and:
          - cn=g-aap-new-o,ou=groups,dc=homelab,dc=wf
# # END BLOCK ORG_NEW ANSIBLE MANAGED BLOCK ORG_NEW
...
This whole section can be simply generated using the team_name as input.
aap_organizations.yml
The 'NEW' organization needs to be created, so we add it to the file.
We add ORG_ to every organization (convention) so we know it is automaticly generated and ansible managed.
Not at this point yet, but it will be soon.
---
aap_organizations_all:
  - name: MGT
    description: 'Automation platform managent'
# # BEGIN BLOCK ORG_NEW ANSIBLE MANAGED BLOCK ORG_NEW
  - name: ORG_NEW
    description: 'Organization for team NEW'
# # END BLOCK ORG_NEW ANSIBLE MANAGED BLOCK ORG_NEW
...
aap_teams.yml
The teams for the organization are created by us, and not through the mapping on the AD, however this can be done, but this way we can be sure that roles assigned to these groups are correctly in place as we run this code. As the teams are only created through the mapping as the user authenticates.
  # START ansible managed ORG_NEW teams
  - name: LDAP_NEW_Admins
    organization: ORG_NEW
    description: Organization Admins (LDAP)
  - name: LDAP_NEW_Developers
    organization: ORG_NEW
    description: Organization Developers (LDAP)
  - name: LDAP_NEW_Operators
    organization: ORG_NEW
    description: Organization Operators (LDAP)
  # END ansible managed ORG_NEW teams
...
Add a user for config as code to the external vault
Just one (local)user is added here, this is the organization admin that runs the configuration as code pipeline and can access rhaap even if the AD/LDAP is unreachable. Every organization has its own organization admin, so there is no way to grant access to another organization through manipulation of the configuration as code.
In a aap_user_accounts.yml file this user would be defined as follows:
# # BEGIN BLOCK ORG_NEW ANSIBLE MANAGED BLOCK ORG_NEW
  - username: CaC_admin_NEW
    password: <password>
    email:
# # END BLOCK ORG_NEW ANSIBLE MANAGED BLOCK ORG_NEW
In the external vault configuration as we use it, we add the user/password to the base_users secret in the vault "
gateway_role_user_assignments.yml
Here we match the organization admin with his organization and grant him the access he needs to configure his own organization.
# # BEGIN BLOCK ORG_NEW ANSIBLE MANAGED BLOCK ORG_NEW
  - role_definition: Organization Admin
    user: CaC_admin_NEW
    org_name: ORG_NEW
# # END BLOCK ORG_NEW ANSIBLE MANAGED BLOCK ORG_NEW
controller_credentials.yml
The secrets that will be used by this organization for fetching collections and excution_environments, are not created for each organization.
These secrets are already defined for the default organization and will be shared among all organizations.
This way we only have to update them once when the token expires for some reason.
controller_organizations.yml
In this file we add a section for each organization that maps the hub secrets of the default organization to the new organization.
---

controller_organizations_dev:
  - name: ORG_NEW
    galaxy_credentials:
      - Default_automation_hub_token_community
      - Default_automation_hub_token_rh_certified
      - Default_automation_hub_token_validated
      - Default_automation_hub_token_published
controller_roles.yml
In this file we add the new organization to the section that enables the organization to use the secrets for the hub.
Add the organization_name under the organizations: key.
  - organizations:
      - ORG_NEW
      - ORG_INFRA
      - ORG_WEB
    credentials:
      - Default_automation_hub_token_published
      - Deafult_automation_hub_token_community
      - Default_automation_hub_token_validated
      - Default_automation_hub_token_rh_certified
    role: use
These are the changes we need to be able to start a team with its own repository. At this point we need to run the pipelines for both repositories in the correct sequence. If this is done, we can start filling in the new organization from a fresh repository.
Once this is done and you see the organization in automation platform with a CaC_admin_NEW organization admin, we can create the repository for the organization. This repository will hold the configuration for the team content in all rhaap environments.
For any new team, we create a repository with base content like described in the following page:
Organization repository
As the organization and the admin user for this new organization are created, we can proceed with creating a new gitlab repository. So we create a new repository for this team in the configascode group in gitlab, and assign the CICD pipeline from common_code/cac/pipeline.yml, so the pipeline will be uniform. Also ad a new ORG_NAME variable to this new repository and we are almost good to go, apart from the files in the repository.
The files needed to configure the controller for a new organization rhaap 2.6 are listed below:
controller_credential_input_sources.yml
controller_credentials.yml
controller_hosts.yml
controller_inventories.yml
controller_inventory_sources.yml
controller_labels.yml
controller_notifications.yml
controller_projects.yml
controller_roles.yml
controller_schedules.yml
controller_templates.yml
controller_workflows.yml
All files starting with controller, hold variables for the controller_configuration roles in the aap_configuration collection.
The values and ranges are wel documented in the collection documentation on github.
We will explain the contents of the complete repository step-by-step as we did for the base configuration for gateway and automation hub. It is essentially the same structure, but with fewer files.
First we wil look back on the directory structure we have shown you before, but only the part we need at the moment:
.
├── group_vars
│   ├── all
│   │   └── yml-files
│   ├── dev
│   │   └── yml-files
│   └── prod
│       └── yml-files
The files we see above are placed in each of the group_vars directories, so each directory will hold the same filenames (content is different!).
All filenames used need to be present in every environment directory, or else the code will not fail.
As you see, the group_vars looks like an inventory, and it basically is, but the thing with inventories is, they tend to overwrite variables. This is not what we want, so the content of the files is slightly different, so the vaiables aren't overidden. I hear you asking why and I will tell you. We don't want to define things twice, ever.
So if we define things in "ALL" we want to be present in all of our environments, but if this where an inventory, as soon as we define somenthing in the same file in dev, we must copy all contents from the "ALL" file to dev AND prod. So that doubles our maintenance for that file.
If we slightly differ the variable names in the files and let the code merge the variables, then the all is still all and merges with the correct environment.
Less copying, less maintenance and easy management.
This is the essence of the configurationas code as I built it.
Adding files
Just like the base_gateway_and_hub configuration, we define the variables in the files exactly like we did there, this means we can reuse the same code and therefore make it all easier to understand. This way we don't take a strange turn, it all looks and feels the same and this makes it easier to manage.
So if You have read the configuration part for the gateway, You know what to do. Else go back and read that part so You'll understand whats coming.
The controller files
Below, You'll find the links to the individual files and their content:
controller_credential_input_sources.yml
controller_credentials.yml
controller_hosts.yml
controller_inventories.yml
controller_inventory_sources.yml
controller_labels.yml
controller_notifications.yml
controller_projects.yml
controller_roles.yml
controller_schedules.yml
controller_templates.yml
controller_workflows.yml
The code in the repository
As we created the directory structure to hold the configuration files we dicussed above this, we need to add the host_vars directories.
It may be obvious what goes in there, but anyway..
We expand the structure above with the following structure and start filling in the files to make things functional.
── host_vars
│   ├── aap_dev
│   │   └── aap_dev.yml
│   └── aap_prod
│       └── aap_prod.yml
├── inventory.yaml
└── main.yml
host_vars/aap_dev/aap_dev.yml
Some vars for the collections to make things run smooth.
---
hostname: localhost
aap_configuration_async_retries: 50
aap_configuration_async_delay: 5
aap_request_timeout: 60
...
The production branch of the host_vars holds the same files, with other values, suitable for the production environment.
inventory.yml
This file is important, but so simple.. just copy this:
---
dev:
  hosts: aap_dev
prod:
  hosts: aap_prod
the real code main.yml
The file main.yml is almost the same in every repository for configuration as code. Just the variables vary.
---
- name: Configure rhaap platform controller base
  hosts: "{{ instance | default('localhost') }}"
  connection: local
  gather_facts: false

  pre_tasks:
    # START VAULT CHANGE
    # When using a vault use this code to read the secrets from the vault
    - name: Get secrets
      community.hashi_vault.vault_kv2_get:
        url: <vault_url>
        token: "{{ vault_token }}"
        namespace: "{{ branch_name }}/{{ org_name }}"
        engine_mount_point: kv
        path: "rhaap_admin"
      register: secrets
      no_log: true

    - name: Set rhaap facts
      ansible.builtin.set_fact:
        aap_hostname: "{{ secrets['secret']['hostname'] }}"
        aap_username: "{{ secrets['secret']['username'] }}"
        aap_password: "{{ secrets['secret']['password'] }}"
        aap_validate_certs: "{{ secrets['secret']['validate_certs'] }}"
      no_log: true
    # END VAULT CHANGE

    - name: Set the gateway vars
      ansible.builtin.set_fact:
        aap_configuration_secure_logging: false

    # We create variables by reading the filenames in the repository
    - name: Find var files for controller and eda
      ansible.builtin.find:
        paths: "group_vars/{{ branch_name }}"
        patterns:
          - 'controller_*.yml'
          - 'eda_*.yml'
      register: _ctl_files

    - name: Create the vaiables for configuration as code
      ansible.builtin.set_fact:
        "{{ (filectl.path | basename | splitext | first) }}": |
          {{ lookup('vars', *[filectl.path | basename | splitext | first + '_all', filectl.path | basename | splitext | first + '_' + branch_name] )|flatten }}
      loop: "{{ _ctl_files.files }}"
      loop_control:
        loop_var: filectl
        label: "{{ filectl.path }}"

  roles:
    - infra.aap_configuration.dispatch
Add EDA (Event Driven Ansible)
Not every (team)organization is able, or even qualified to use Event Driven Asnsible for whatever business reason.
So we do not add this by default to an organization, we add this when needed or even create a separate organization to handle EDA playbooks and events.
So I chose to create a separate organization and added the eda files to this organization.
This can be automated and I will probably do that lateron in the process, for now I add them manually.
The eda files
Add the following files to the exsisting files in every group_vars directory:
eda_controller_tokens.yml
eda_credentials.yml
eda_event_streams.yml
eda_projects.yml
eda_rulebook_activations.yml
Change code in main.yml
Add the following code to the main.yml: below the set_fact for the controller and above the include_role that runs the 'infra.aap_configuration.dispatch'.
    - name: Do fixups for activation rulebooks if needed
      ansible.builtin.include_tasks: stop_running_rulebooks.yml
This is all that is needed to use config as code in Automation platform Event Driven Ansible.
The above code is as it runs in my lab environment (exept the secrets). The Configuration as code can only apply changes, or run flawlessly, when no rulebooks from this configuration are active, so we must determine which are active and stop these temporarily. This is done by the following playbook:
I found this as a role, using a custom filter plugin, I rewrote the code so the thing done by the filter plugin is now done with jinja inside the play itself. For me that is more readable than a separate filter plugin.
stop_running_rulebooks.yml
---

- name: Fixup rulebook activations if EDA config included
  when:
    - eda_rulebook_activations is defined
    - (eda_rulebook_activations | length) > 0
  block:
    - name: Show activations configured
      ansible.builtin.debug:
        var: eda_rulebook_activations

    - name: Default set of rulebook activations to stop to empty
      ansible.builtin.set_fact:
        rulebook_activations_to_disable: []

    - name: Determine whether we have any enabled activations due to configure
      ansible.builtin.set_fact:
        enabled_activation_names: >-
          {%- for ruleb in eda_rulebook_activations  -%}
          {%- if ruleb.state == 'present' -%}
          {{ ruleb.name }}
          {%- if not loop.last -%},
          {%- endif -%}
          {%- endif -%}
          {%- endfor -%}

    - name: Retrieve existing rulebook activation configs
      ansible.eda.rulebook_activation_info:
        aap_hostname: "{{ aap_hostname }}"
        aap_username: "{{ aap_username }}"
        aap_password: "{{ aap_password }}"
        aap_validate_certs: "{{ aap_validate_certs }}"
      register: rbas

    - name: Filter out enabled and running activations
      ansible.builtin.set_fact:
        enabled_running_activations: "{{ rbas.activations | selectattr('is_enabled') | map(attribute='name') }}"

    - name: Work out configured and existing rulebook activations to stop
      ansible.builtin.set_fact:
        rulebook_activations_to_disable: "{{ rulebook_activations_to_disable + [ item ] }}"
      when: item in enabled_running_activations
      loop: "{{ enabled_activation_names.split(',') }}"

    - name: Disable selected activations for management
      ansible.eda.rulebook_activation:
        aap_hostname: "{{ aap_hostname }}"
        aap_username: "{{ aap_username }}"
        aap_password: "{{ aap_password }}"
        aap_validate_certs: "{{ aap_validate_certs }}"
        name: "{{ item }}"
        state: disabled
    #   loop: "{{ enabled_activation_names.split(',') }}"
      loop: "{{ rulebook_activations_to_disable }}"

  rescue:
    - name: Rescue block for error in rulebook activation check
      ansible.builtin.debug:
        msg: "Rescuing"
The configuration as code for EDA should run without any problems now.
The project that is configured with this config, is found here:
EDA_example_project
Creating a workflow over multiple organizations
As the configuration is now separated in multiple organizations, we have teams that are in full controll of their credentials, projects, templates and workflows.
So each team can perform their actions automated by running a job_template or workflow. This is the start of a fully automated deployment, but we want more.
I will describe the workflow creation for two teams:
- Infrastructure team (creating VM's)
- Linux team (configure the VM and Patching)
Infrastructure team
First the Infrastructure team has created a project to automate the deployment of virtual machines. This project is used on a job_template with the following definition in the configurationas code for the INFRA organization.
  - name: INFRA_vm_create
    description: Create and register VM's
    organization: ORG_INFRA
    project: INFRA_infra
    inventory: Default_inventory
    playbook: main.yml
    job_type: run
    fact_caching_enabled: false
    credentials:
      - INFRA_ansible
      - INFRA_vault_deploy
    concurrent_jobs_enabled: false
    ask_scm_branch_on_launch: false
    ask_tags_on_launch: false
    ask_verbosity_on_launch: false
    ask_variables_on_launch: true
    extra_vars:
      instances: host or group
    execution_environment: ee-vm-handling
    survey_enabled: false
    survey_spec: {}
The definition of this template is quite simple and working for the Infrastructure team. As they pass the hostname for the new VM, the creation starts.
For the record, the specs for this host (like memory and disks are in the host_vars file in the inventory, not shown here).
Linux team
The Linux team has created 2 separate projects:
- OS configuration (configure NTP, sshd, selunix, users, etc)
- OS patching (apply the latest patches)
These are defined in their config as code repository as follows:
  - name: LNX_configure_OS
    description: Configure OS settings
    organization: ORG_LNX
    project: LNX_rhel
    inventory: Default_inventory
    playbook: main.yml
    job_type: run
    fact_caching_enabled: false
    credentials:
      - LNX_ansible
      - LNX_vault_deploy
    concurrent_jobs_enabled: false
    ask_scm_branch_on_launch: false
    ask_tags_on_launch: false
    ask_verbosity_on_launch: false
    ask_variables_on_launch: true
    extra_vars:
      instances: host or group
    execution_environment: Default execution environment
    survey_enabled: false
    survey_spec: {}

  - name: LNX_Patch_OS
    description:
    organization: ORG_LNX
    project: LNX_maintenance
    inventory: Default_inventory
    playbook: run_dnf_update.yml
    job_type: run
    fact_caching_enabled: false
    credentials:
      - LNX_ansible
    concurrent_jobs_enabled: false
    ask_scm_branch_on_launch: false
    ask_tags_on_launch: false
    ask_verbosity_on_launch: false
    ask_variables_on_launch: false
    extra_vars:
      instances: host or group
    execution_environment: Default execution environment
    survey_enabled: false
    survey_spec: {}
ALso these templates work for the Linux team and can be run separately to do their stuff.
For the patching template they have implemented a schedule to keep all systems up-to-date, according company policy.
If you want to create a workflow using all these templates, as rhaap is configured at the moment, this will not work. We need to change some thing to make this work.
To make things a little clearer, I have created a separate organization in rhaap, with its own users and organization repository, called ORG_WFL.
We will configure the access rights needed to create the workflow step-by-step.
As each team (INFRA and LNX) is in control of what they create and share, they must configure the job_templates to share for 'use' and to who they give this right, conforming to RBAC.
Infrastructure access for ORG_WFL
The infrastructure team updates the following file in the configuration as code repository they own to give the WFL admins team access to the INFRA_vm_create job template:
/group_vars/{env}/controller_roles:
  - job_templates:
      - INFRA_vm_create
    teams:
      - LDAP_WFL_Admins
      - LDAP_WFL_Developers
      - LDAP_WFL_Operators
    roles:
      - execute

  - organization: ORG_INFRA
    teams:
      - LDAP_WFL_Admins
    roles:
      - read
As you can see here, there are 2 items to be added, this is what they do:
The job_templates variable gives the teams in the WFL organization the right to execute the job_template, but they cannot read or see it. So if they want to create a workflow using this job_template, they wouldn't find it and it will fail.
This is where the second access right comes in, this gives only the admins for the WFL organization the right to see things in the INFRA organization, so they can find the job_template and use it to create a workflow, that the other team in the organization can use.
LNX access for ORG_WFL
For the Linux team, almost the exact same changes must be done to accomplish the sharing of the 2 job_templates they made:
/group_vars/{env}/controller_roles:
  - job_templates:
      - LNX_configure_OS
      - LNX_Patch_OS
    teams:
      - LDAP_WFL_Admins
      - LDAP_WFL_Developers
      - LDAP_WFL_Operators
    roles:
      - execute

  - organization: ORG_LNX
    teams:
      - LDAP_WFL_Admins
    roles:
      - read
As the pipelines are run to configure the new options into rhaap the access rights as specified are granted.
WFL workflow definition
As you can see in the examples above, to accomplish this over many team/organizations requires a strict naming convention, so it is clear and deductable what needs to be configured.
The workflow definition for the WFL organization using all three job_templates, would look like this:
controller_workflows_dev:
  - name: Deployment workflow
    description: A basic workflow for system deployment
    extra_vars:
      instances: host or group
    allow_simultaneous: true
    ask_variables_on_launch: true
    inventory: Default_inventory
    limit:
    scm_branch: master
    ask_inventory_on_launch: false
    ask_scm_branch_on_launch: false
    ask_limit_on_launch: false
    webhook_service: ''
    webhook_credential:
    organization:
      name: ORG_WFL
    workflow_nodes:
      - all_parents_must_converge: false
        identifier: INFRA-000
        unified_job_template:
          name: INFRA_vm_create
          type: job_template
          organization:
            name: ORG_INFRA
        related:
          success_nodes:
            - workflow_job_template:
                name: Deployment workflow
              identifier: OS-config
      - all_parents_must_converge: false
        identifier: OS-config
        unified_job_template:
          name: LNX_configure_OS
          type: job_template
          organization:
            name: ORG_LNX
        related:
          success_nodes:
            - workflow_job_template:
                name: Deployment workflow
              identifier: OS-patch
      - all_parents_must_converge: false
        identifier: OS-patch
        unified_job_template:
          name: LNX_Patch_OS
          type: job_template
          organization:
            name: ORG_LNX
    survey_enabled: false
    survey_spec: {}
If the access rights are configured correctly, the workflow is created successfully and can be started by the users is the WFL organization. Full controll of each job_template and used credentials in these templates, stays in the teams that exposed the templates. Also the projects are not shared and version management of all content is still under the controll of the originating team.
This way each team is autonomous, but the organization can make use of the products they create and share.
This example can be extended/changed as your organization needs are different than a lab setup.
Going further than only the OS installation
For most organizations it will not end with the installation of the OS itself, an application will not install itself if the server is availlable. So the chain must be extended from here, we can do this in various ways:
- create multiple, specific workflows one per application
- create separate playbooks/job_templates (we need them anyway)
- extend the above workflow in a flexible way to read the next step from the host_vars
The creation of multiple workflows is just a matter of copy/paste the above workflow and add the steps that are needed and save this as a new name.
The playbooks/job_templates to install the applications, we need anyway, so that would be the first step to full automation.
When the job templates for the installation of the applications are ready and have been entered into rhaap, we can start extending the workflow.
For this example we assume the WEB team has created a playbook/job_template in their organization with the name: WEB_apache and the MON(intoring) team has done the same for their monitoring tool and has created the MON_agent template. These templates are shared with the WFL organization, as are the INFRA ans LNX templates.
The workflow playbook
In order to extend the deployment workflow dynamicly, we create a simple playbook that will read the vars from the hostvars and act on these through itteration.
The playbook below is added in the deployment workflow as the last step in the flow.
This will check the hostvars of the machine for the definition of the buidingblocks variable.
And if this variable is not found, will end the play, otherwise it wil start itterating through the list.
main.yml
---
- name: Run buildingblock jobs
  hosts: "{{ instances |default('dummy') }}"
  gather_facts: false

  pre_tasks:
    - name: Stop play if nothing to do
      ansible.builtin.meta: end_play
      when: buildingblocks is not defined
      delegate_to: localhost

  tasks:
    # Start the job template in a separate file, because we want to fail the
    # play if the job fails.
    - name: Loop over the defined steps
      ansible.builtin.include_tasks:
        file: job_launch.yml
      args:
        apply:
          delegate_to: localhost
      loop: "{{ buildingblocks }}"
      loop_control:
        loop_var: template_name
      when: buildingblocks is defined
For every item in the list it wil import the tasks below and run these, what will result in an API call to rhaap, starting the job_template in the configured organization.
job_launch.yml
- name: Debug launch params
  ansible.builtin.debug:
    var: template_name

- name: Launch job template "{{ template_name }}"
  ansible.builtin.include_role:
    name: infra.aap_configuration.controller_job_launch
  vars:
    controller_launch_jobs:
      - name: "{{ template_name['name'] }}"
        organization: "{{ template_name['organization'] }}"
        extra_vars:
          instances: "{{ inventory_hostname }}"
          buildingblock: "{{ template_name }}"
        wait: true
  register: job
The hostvars
The hostvars definition holds the key to the installation of products on the system:
host_name: webserver.homelab
ip_address: 10.1.2.12
cpu_cores: 2
disk_size: 4
memory_size: 1024
swap_size: 256
id: 1331
type: qemu
proxmox_node: proxmox02
os:
  name: LNX_rhel
  version: master
buildingblocks:
  - name: WEB_apache
    organization: ORG_WEB
  - name: MON_agent
    organization: ORG_MON
In this case, there will be 2 products installed, directly after the machine configuration:
- an apache webserver
- a monitoring agent
And nobody touches the system to do anything, this is really Look Mammy, No hands!
The forementioned example is ofcourse just that, an example, how you might implement this, is entirely up to you.
Screenshots
After applying all the configuration steps described in this document, your rhaap environment could look something like this after login:
Dashboard:
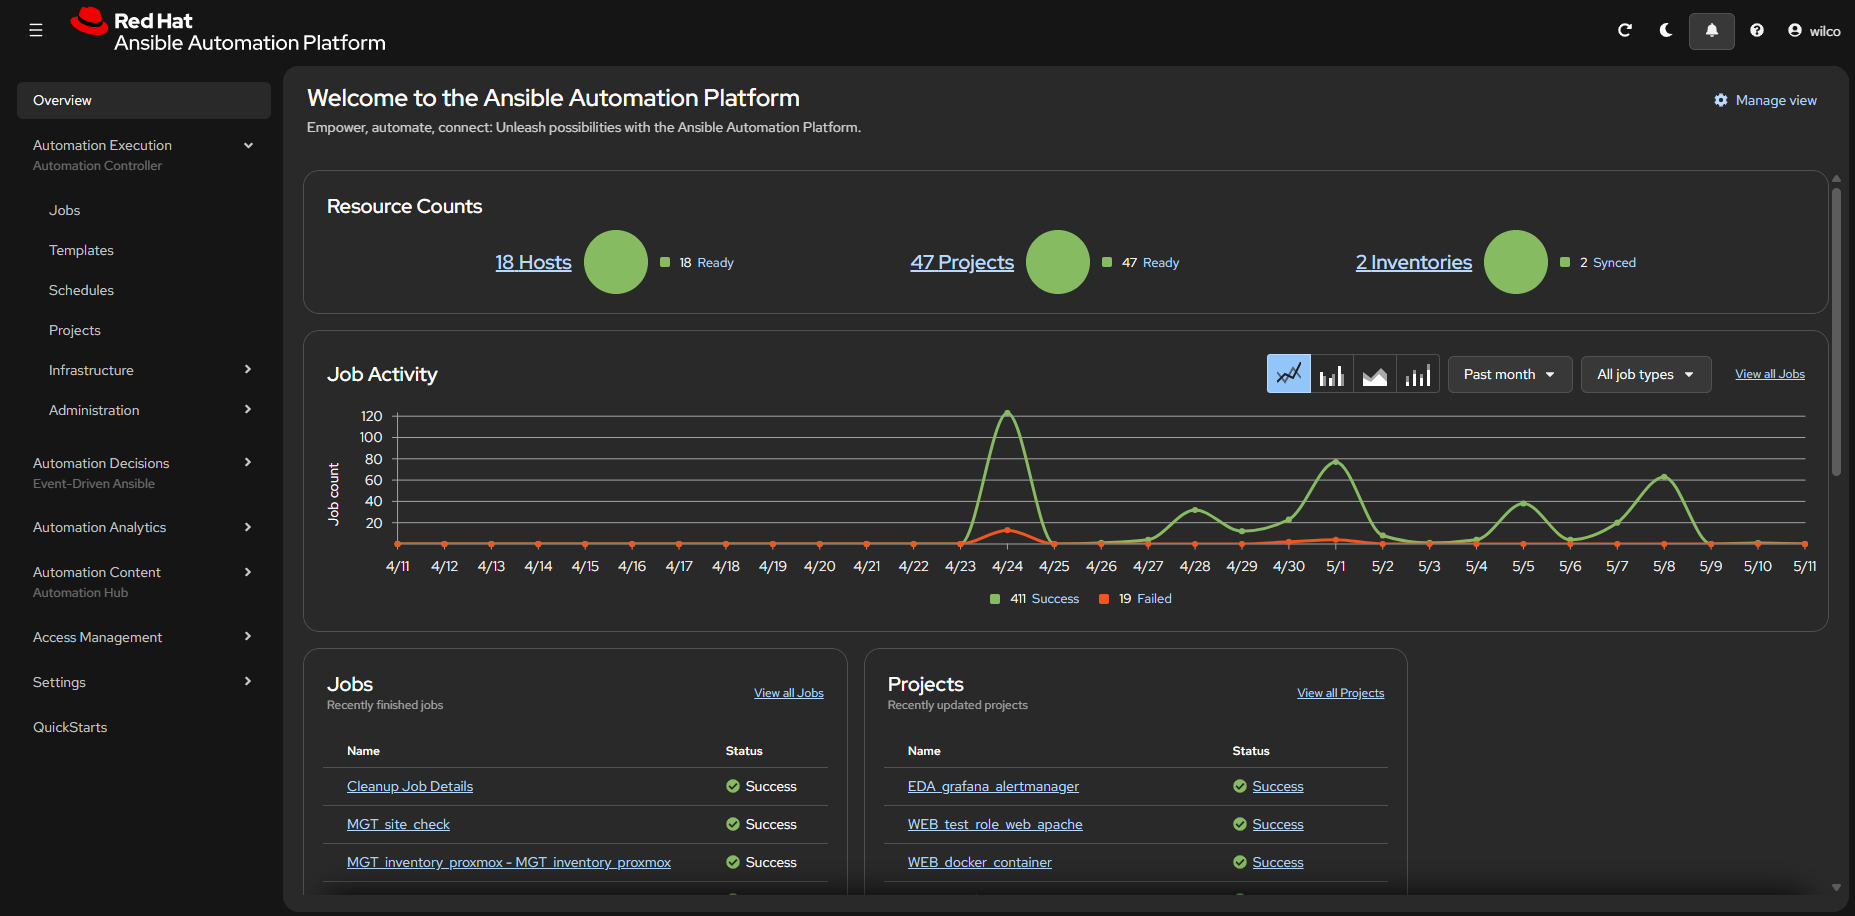
Organizations overview:
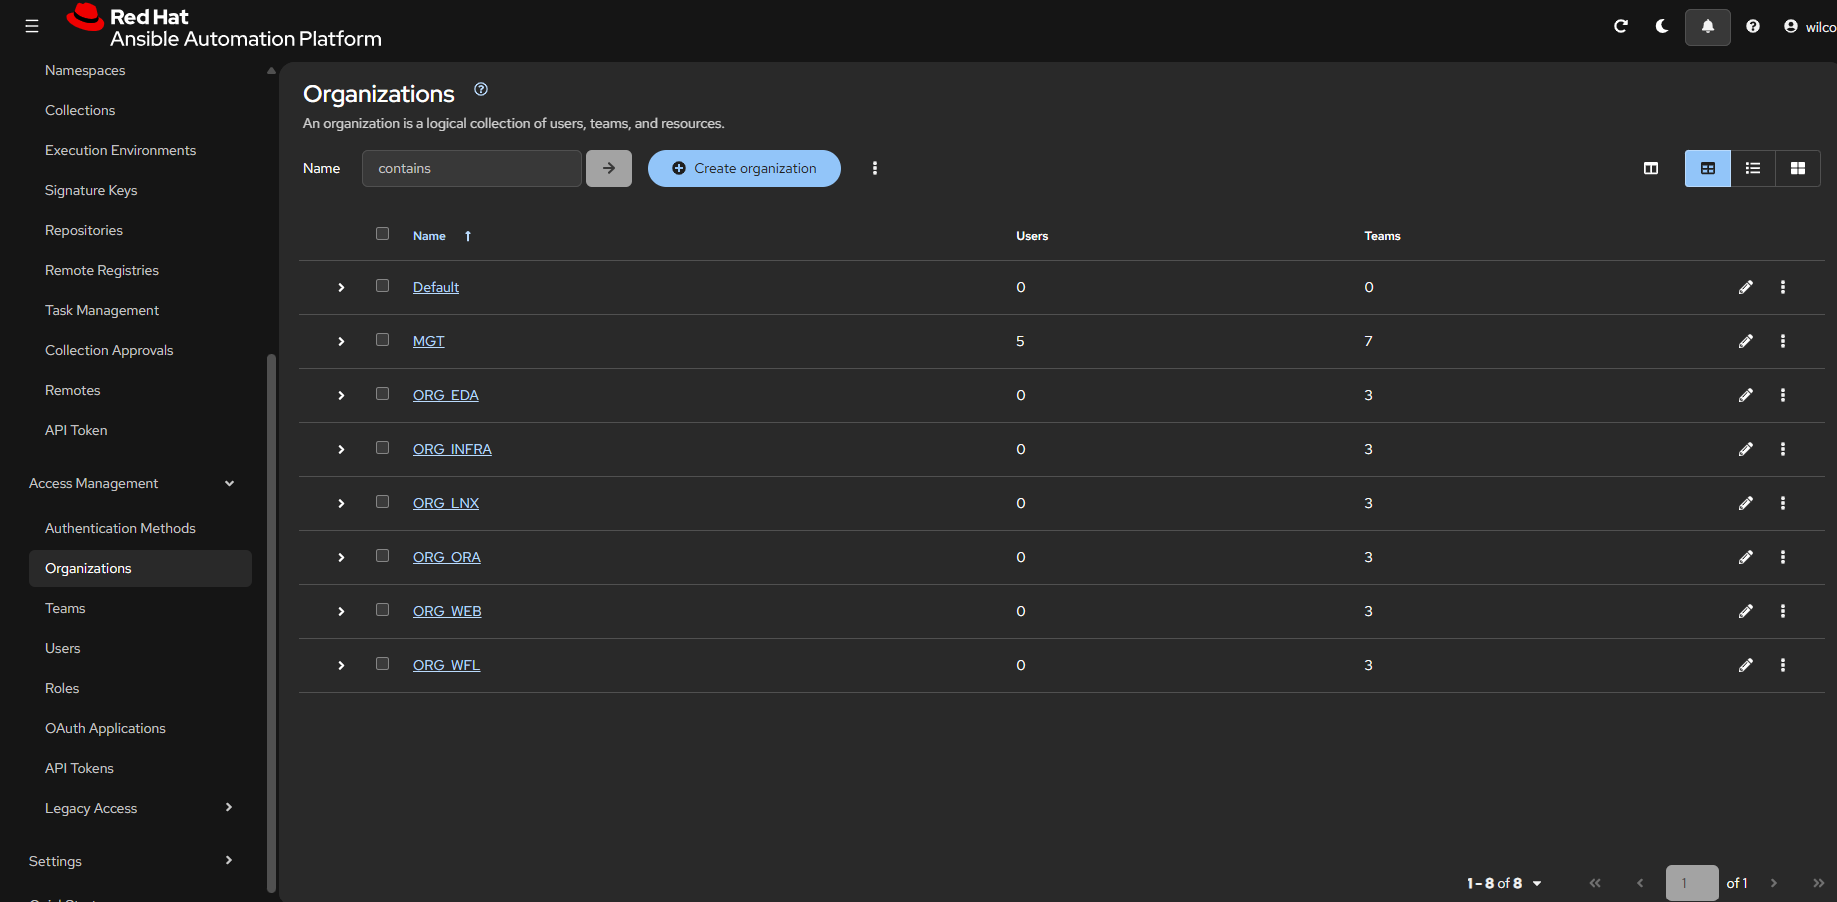
Private hub repositories:
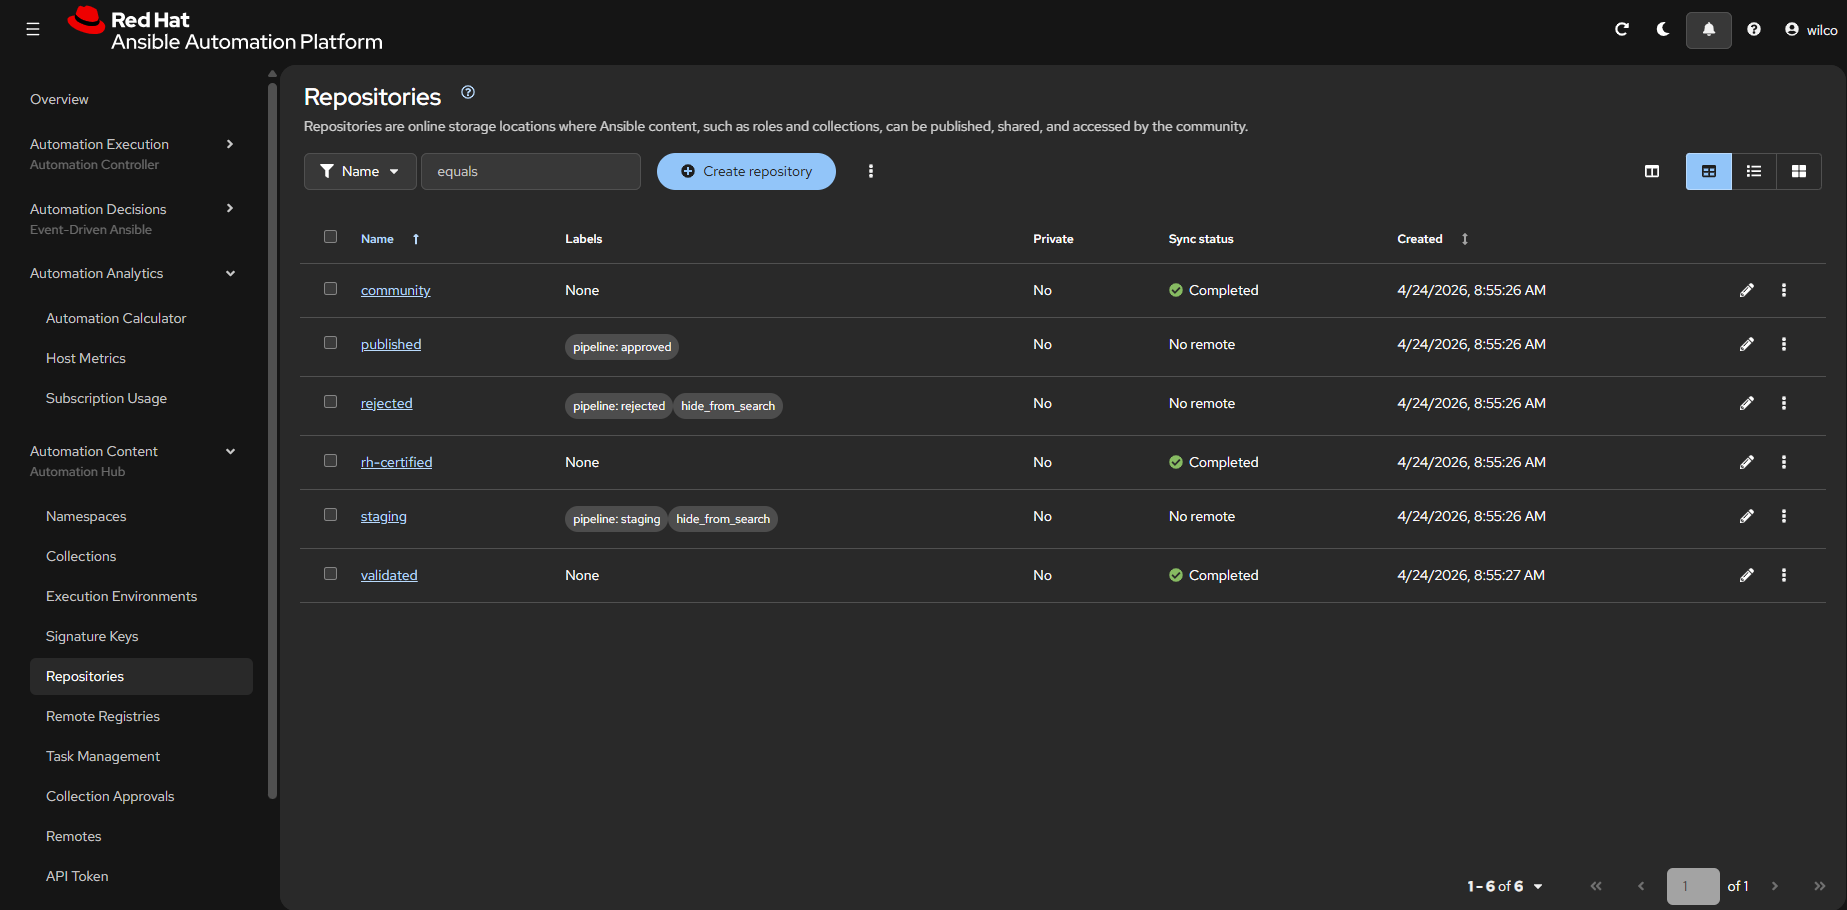
Private hub collections:
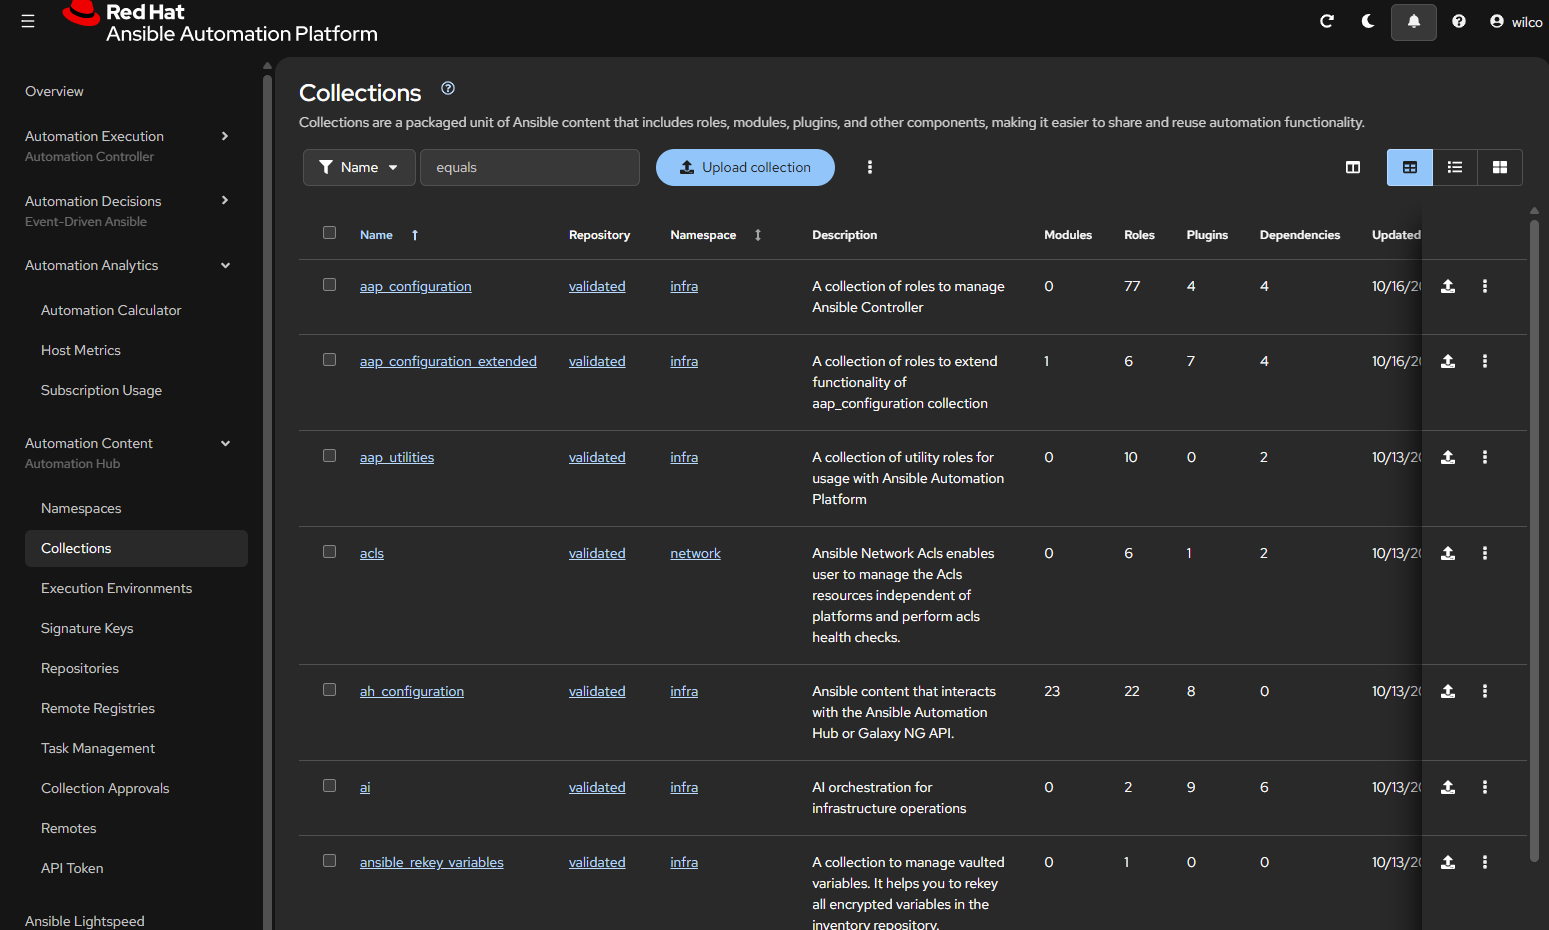
Rhaap controller credentials:
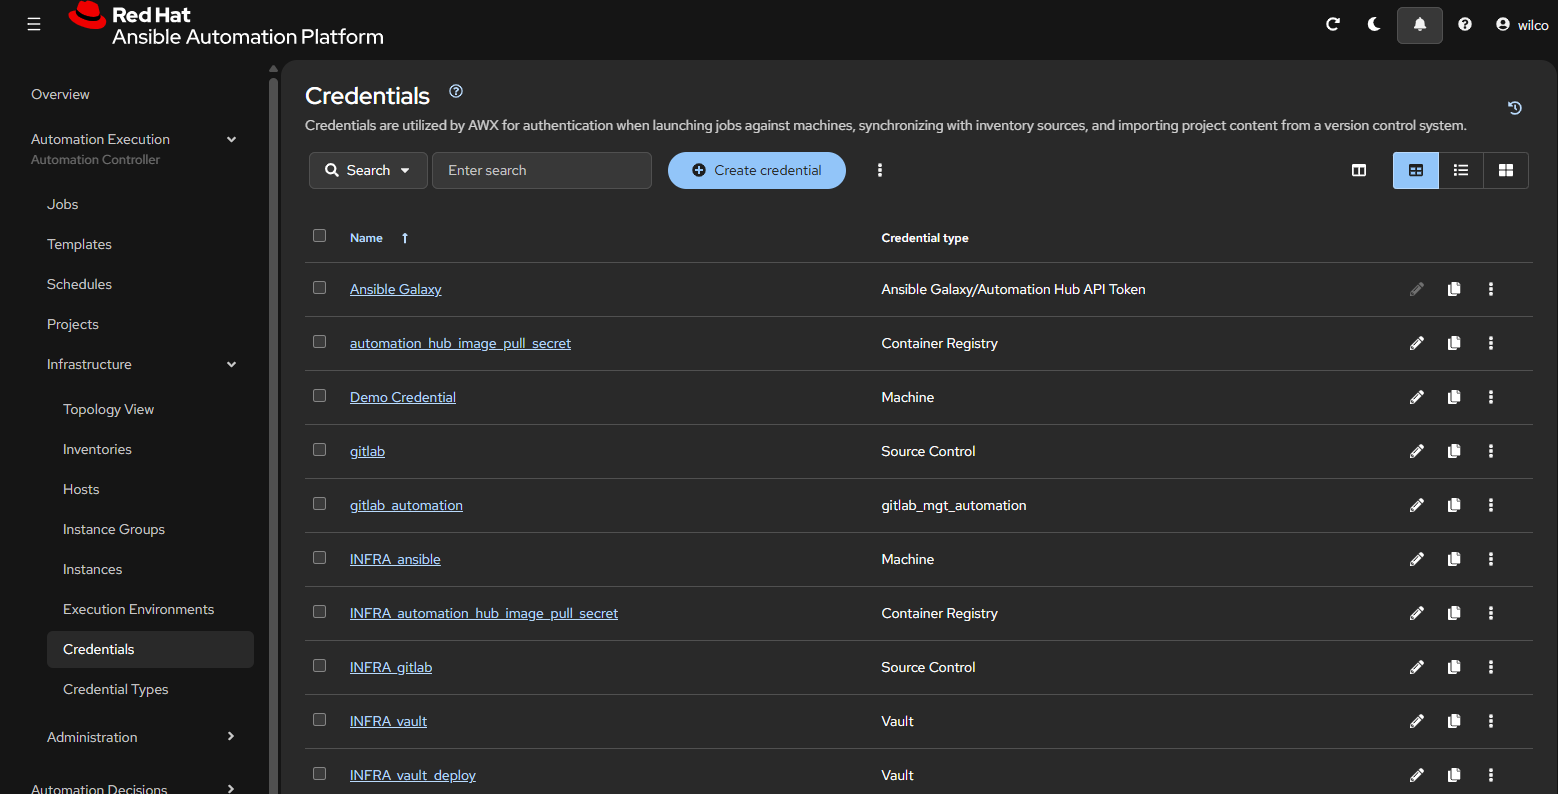
Rhaap EDA rulebook activations:
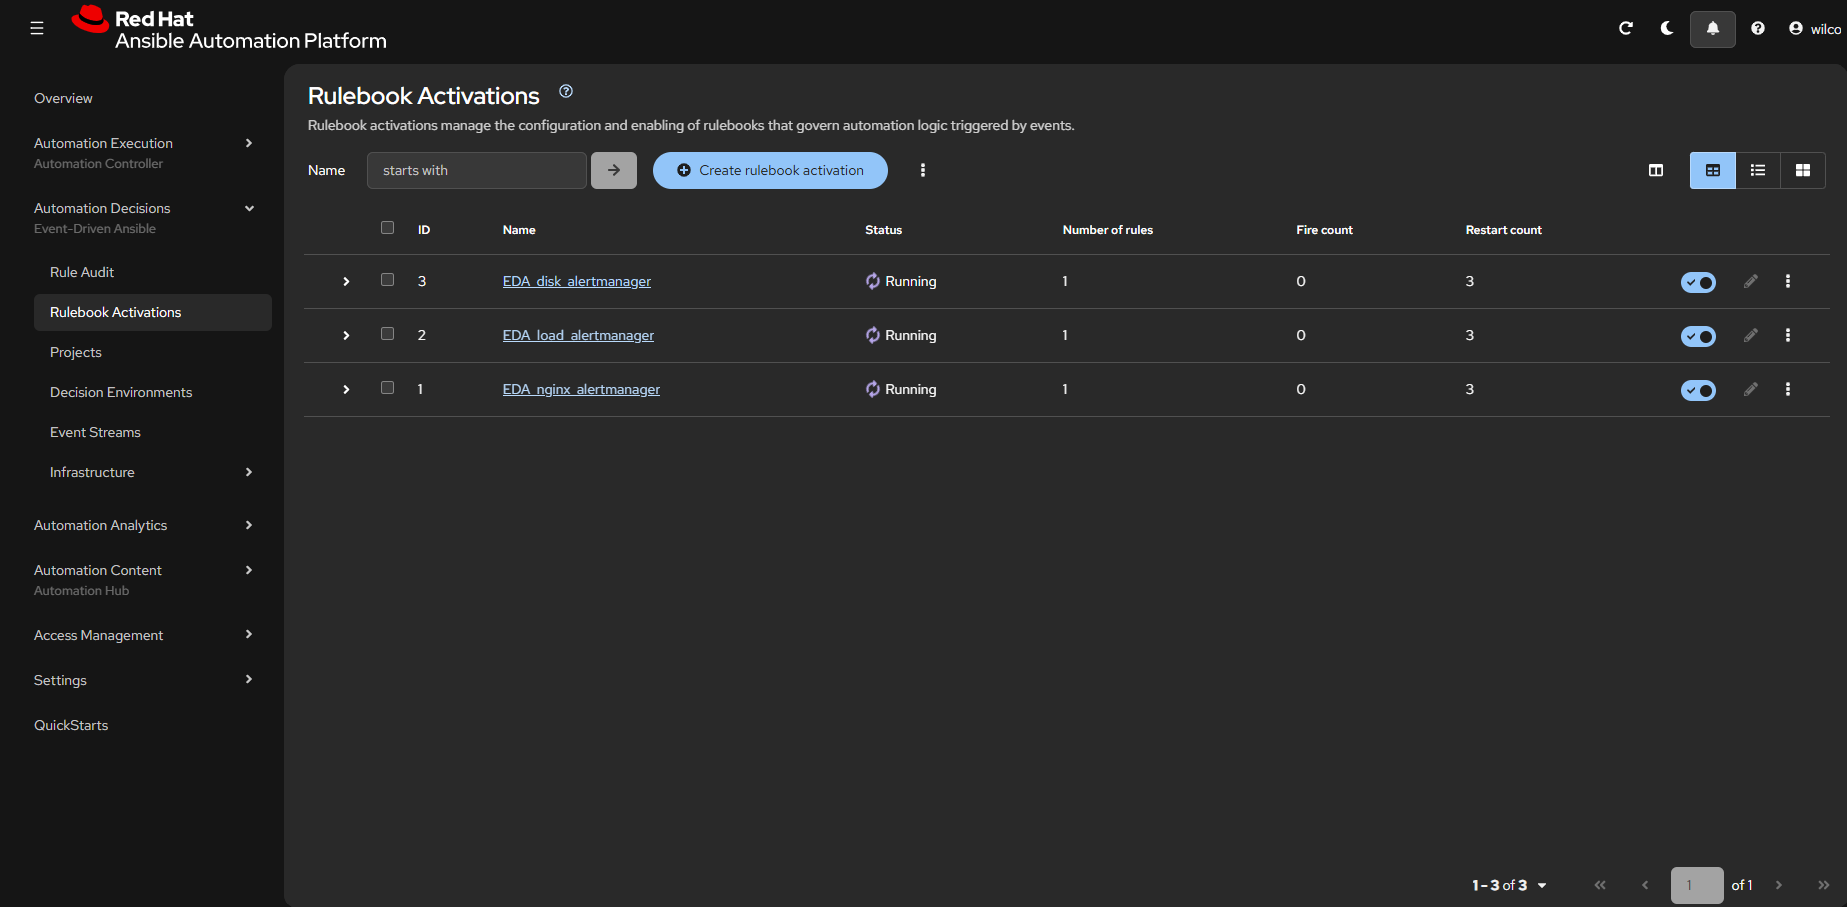
Rhaap Automation Analytics: